Difficulty: 
If you have made it this far, please continue.
Time Required
Affiliate Links
Cost
$150-400, dependent on how complex you want to make it and how much capacity you want. After it was all completed, I had close to $300 in my system.
I chose the iSpring RCC7 5-Stage system and I would highly recommend it.
Background
When I started brewing, I was buying Ice Mountain brand spring water from the grocery. In my opinion it was the best tasting water, so I used that for my brewing water. I then started dabbling in water chemistry, so I got an inline charcoal filter for my home water and got a WARD labs test done and used those results as absolute fact. It is well known that the water in Indianapolis is extremely hard.
The WARD lab report showed a TDS value of 501 and a Total Hardness of 334. Of note, I submitted two samples and the charcoal filter did nothing for any of the measured levels in the water. I was naive and assumed that it would. They really just filter the chlorine in the water.
I still would in most cases split my home water with a 50:50 mix of Ice Mountain and my home water. Of course my desire to simplify my process, I wanted to take one less trip to the grocery store out of my brew day prep.
I had mostly decided to take the leap of installing an RO system. It was then one day having a conversation with a neighbor who works for the Indianapolis Water Company that cinched it. He was talking about the variety of sources for water that are available to Indianapolis Water and that those sources change often, even daily.
Well, I might as well throw my water report out in the trash right?
One thing I value in my process is repeatability. I don’t want to brew a batch of beer one time, then brew it again a year or so later and have it be completely different. One variable I can control is the water used in my beer.
The best way to do that is to strip the water down to nothing, then rebuild it with mineral additions. One could argue that this is more complicated than just buying your water from the grocery store or the tap. Sure, but I heard in one podcast, paying attention to your water is the difference between a beer scoring 30 and one scoring 40. Plus, now that I’ve got my mineral additions routine worked out, it’s really like weighing out your hops, so no big deal.
Mineral additions and how to do it is not covered in this post. However, if you do wish to go with a recommended profile and use Beersmith3, I have another post Beersmith 3 BJCP Water Profiles that shows how to add recommended water profiles for 72 BJCP water styles. This post will show how to quickly add these profiles to Beersmith3 so that you can use the built-in water profile mineral addition calculator.
This post will show
- The basic components of a RO (Reverse Osmosis) system
- Some of the considerations when choosing a system
- A brief explanation of how they work
- How I chose to install my system
If this post helps you in selecting a RO system, please consider supporting this site by clicking on and purchasing your system or other products through the affiliate links in this post and on this website.
Basic Components of a RO system and what I chose
Filtration
Holding tank
Faucet
Tubing
Considerations before purchase
- Permanent or portable? I had seen some of the portable systems and considered those, but since I was looking to spend a decent amount of money on an RO system, I figured I might as well enjoy the water beyond brew days and install a permanent system.
- Number of filter stages (more is better??). I chose a 5 stage system. The more stages, presumably a greater filtration level. My system quoted filtration down to 0.0001 microns.
- Availability and cost of filter replacements. Mine uses a standard size, but I’ve seen some that use smaller filters or larger capacity systems that use more expensive longer filters.
- All-inclusive kit. Most contain every component you need, but make sure you know what you are getting. Some come with tubing, some don’t. Mine was very complete with everything needed, except common tools.
- Holding tank size. Mine came with a 4 gallon (3.2 available), but I would prefer at least a 14 gallon that would have 10.7 gallons of RO water on hand at any point in time. Only having 3.2 gallons available to dispense at a time, means that when preparing for a brew day, I must empty the tank twice to get enough water for my all-electric Brewer’s Edge Mash & Boil’s 4 gallon batch sizes.
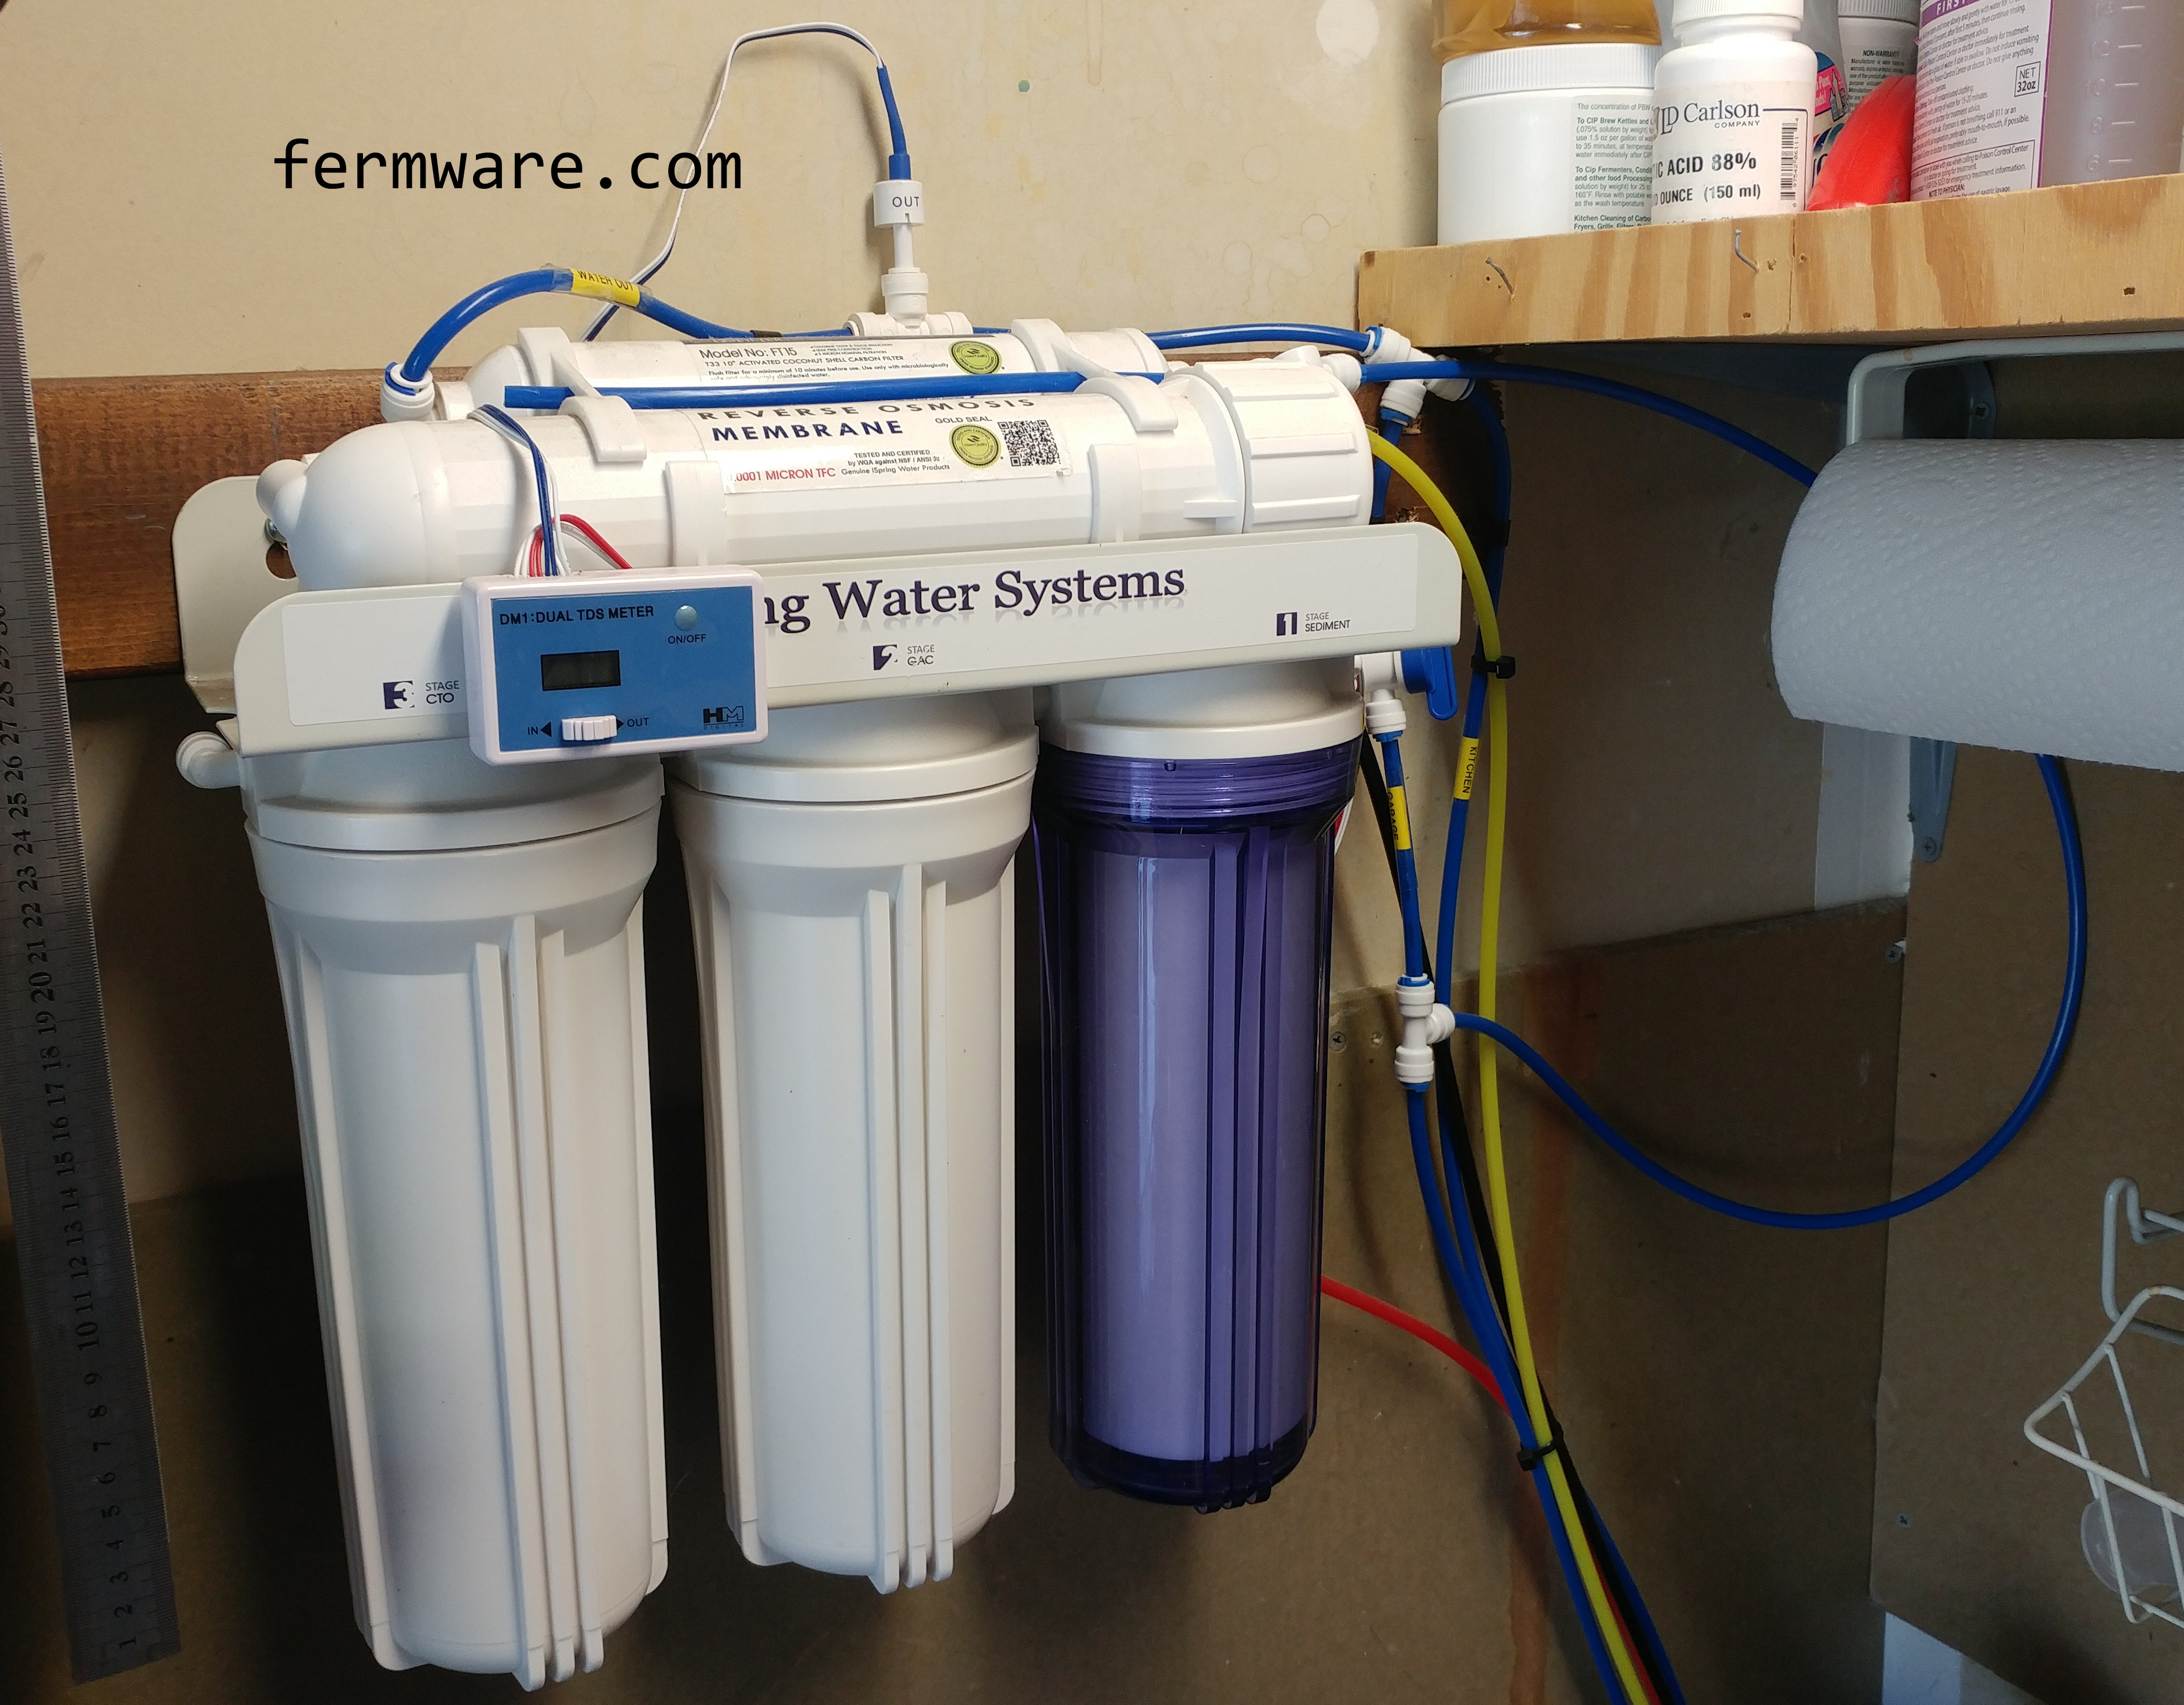
- Transparent filter cover for first stage. I liked this feature in the one I purchased, because it allows me to see when the filter will turn from a new white color to brown and rusty or whatever it will turn to.
- Daily throughput. Again, decide what your needs are. Ours is just for brewing and drinking water at two faucets. 75 gallons per day is completely sufficient for us. If you are starting a nano-brewery, you’ll probably need more.
- Do note that just like your beer tap lines, the further away you are from the holding tank / RO unit, you’ll experience much lower flow rates. Remember the concept of head loss from kegging 101? At our kitchen sink, the flow out of the RO faucet is just a nice slow flow, but in the garage, it’s almost like a hose!
How they work
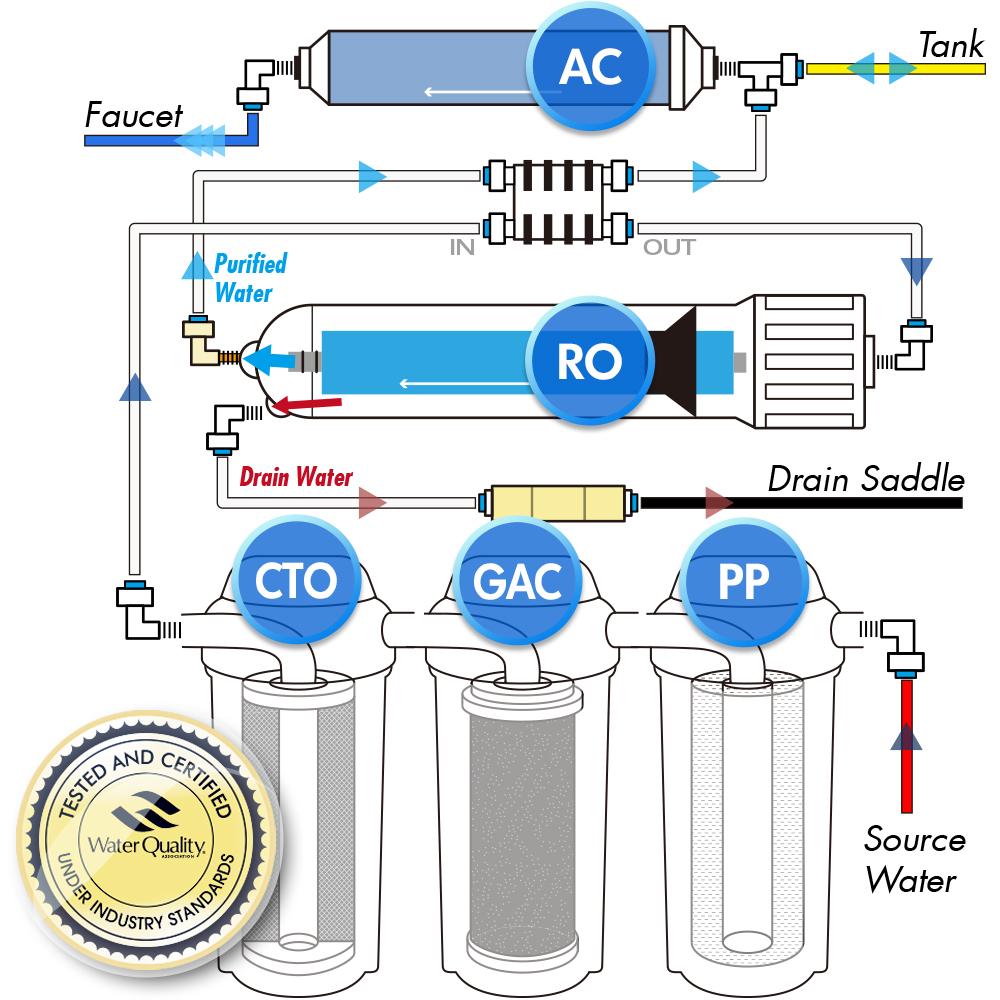
Essentially water comes in from the source, and goes through 3 pre-filters, then goes to the reverse osmosis membrane where the water is then split into waste water and RO water. Finally, it then either goes straight out to the faucet or goes to the holding tank reservoir.
Stage 1 Sediment Filter (PP): Sediment filtration extracts suspended sediment, dirt, rust, silt and sand
Stage 2 Granulated Activated Carbon (GAC): pre-filter reduces and removes: chlorine, volatile organic compounds (V.O.C), pesticides, nitrates, herbicides, tastes, odor, and disinfection by-products (Chloramines, THM, TCE)
Stage 3 Carbon Block (CTO): pre-filter removes Chlorine, then reduces or entirely removes Pesticides, Nitrates, Herbicides, tastes, odor, and disinfection by-products (chloramines, THM, TCE), Volatile Organic Compounds (V.O.C).
Stage 4 Reverse Osmosis Membrane (RO): This semi permeable membrane filters and rejects tiny impurities down to 0.0001 of a micron removing impurities such as colloid, heavy metal, dissolved solids, germs and other harmful substances. Virtually only water molecules and dissolved oxygen can pass through the Reverse Osmosis Membrane. The rejected contaminants are flushed to drain. The good output is now essentially RO water!
It is important to note that part of an RO system involves some waste water. I haven’t measured it, but I’ve seen quotations that for every one gallon of RO water, the system will have rejected about 2.5 gallons of waste. If you live in an area where water conservation is at a premium, you need to take this into consideration.
ASO Valve: This is the rectangular piece shown. It shuts the system off when the tank is full to conserve water.
Stage 5 Post Activated Carbon Filter (PA): Post Carbon Final polishing filter for taste and odor. The final clean water will either go to the faucet for immediate usage or will go to the holding tank for future on-demand supply.
Waste
After initially publishing this post, a user (rdcpro) on a Reddit thread had some good information on water recovery on commercial systems that I was unaware of. They indicated instead of a 25% recovery on home level systems, a commercial systems would be much higher (on the order of 90%).
A 25% recovery would mean that for 4 gallons input to the system, you would get 1 gallon of RO water (1/4 = 25%). They are able to achieve this with much higher pressures.
Here also is a much more technical link rdcpro provided on Reverse Osmosis systems if you are into that type of info.
https://puretecwater.com/downloads/basics-of-reverse-osmosis.pdf
If you have a hard time justifying the wastewater aspect of a home reverse osmosis system, you could buy a pressurized system or look for creative ways to use the waste water. Some internet searches note collecting wastewater in a rain bucket for plants or watering the lawn. Keep in mind the wastewater will have high levels of the things you don’t want for drinking water.
Tools/Materials Required
-
Cordless drill
-
Mounting screws (may or may not come with your system)
-
Tube cutter
-
Optional, but makes things easier
-
This should be an essential part of your brewing toolkit anyway for cutting kegging and dispensing tubing
-
-
Water pressure gauge
-
Various RO couplers, Tee’s and valves
-
Label maker – if you want to place labels on the tubing as well
- Great to have in the brewery anyway
-
Color coded tubing
-
Inline TDS meter (optional)
-
Additional faucet (optional)
My Installation
Here was the process to install my iSpring RCC7 system, but it should be a similar process to most other systems.

Plumbing Connections

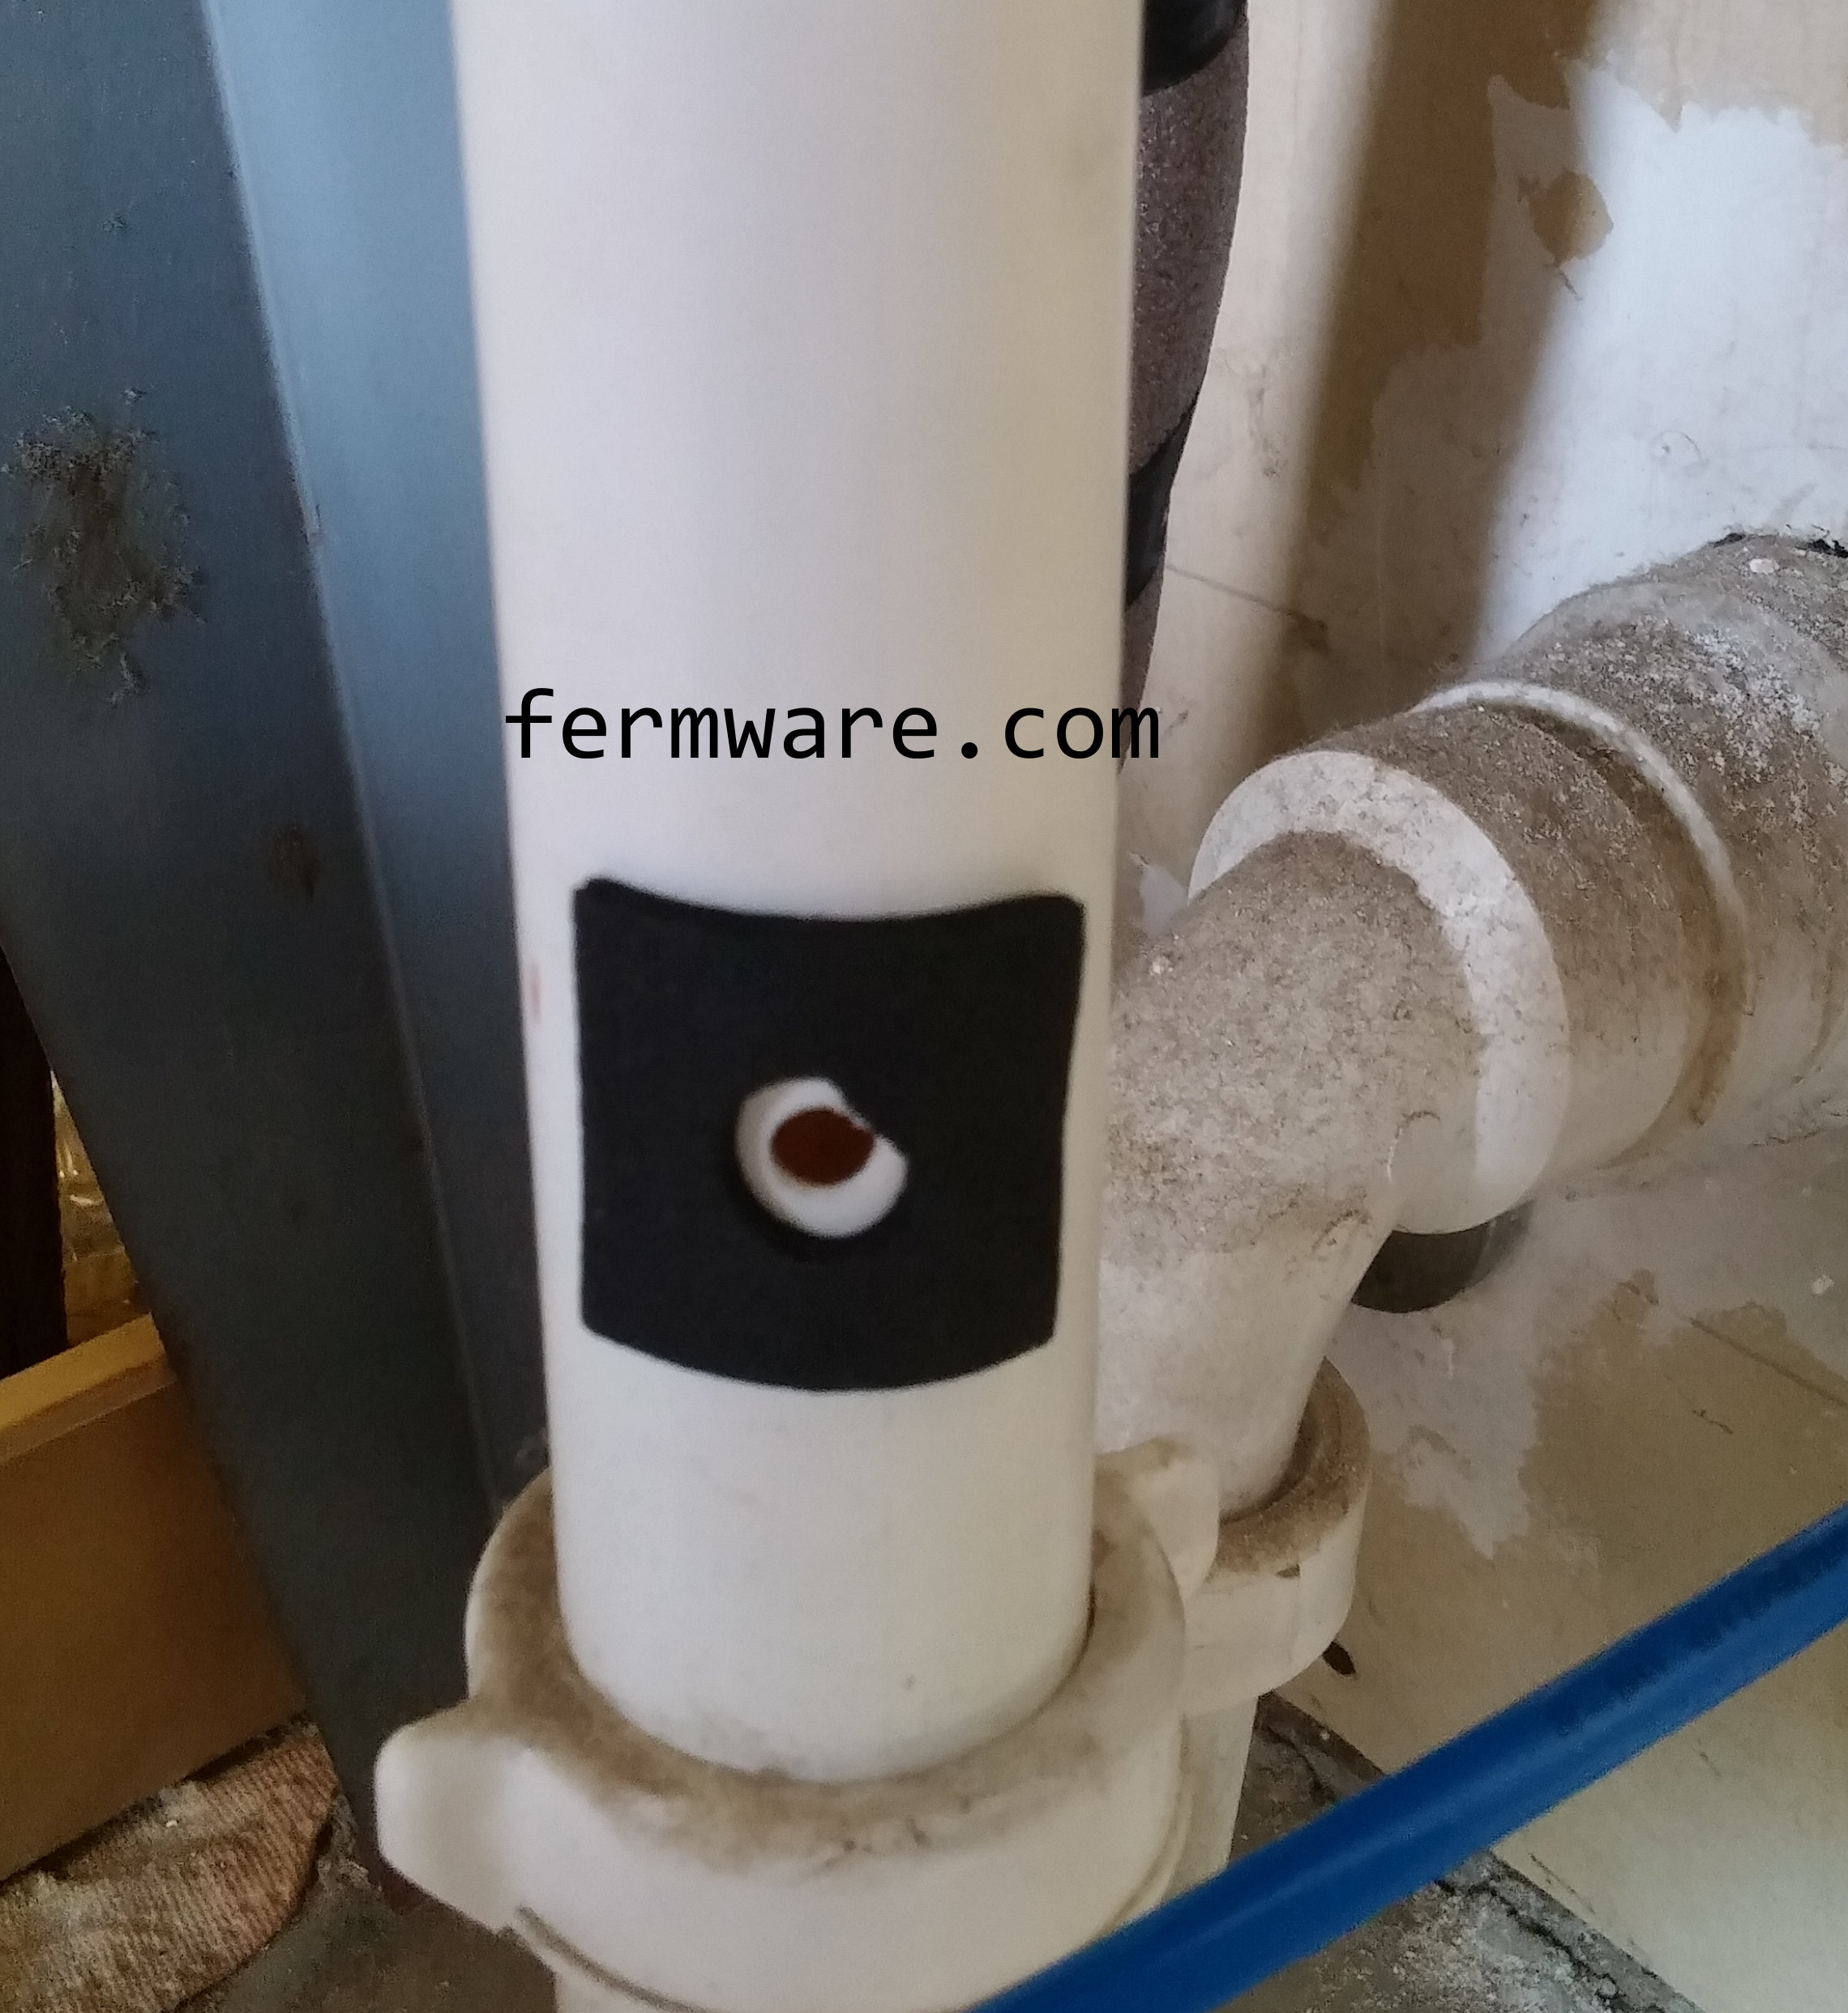


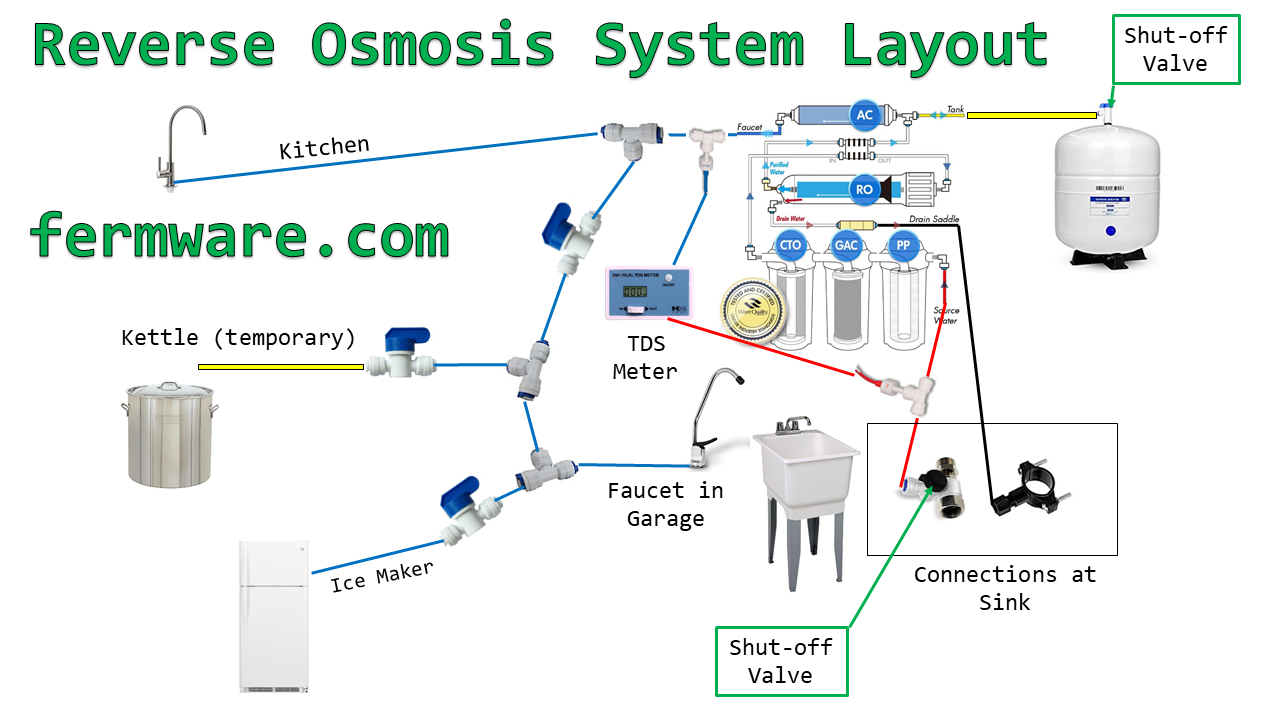
Here is a diagram of my system. You can see it has a few branches and valves to cut each section off.
System Performance

Maintenance
Another question that will come up during ownership or in the research phase is how often to replace filters. Several manufacturers seem to all state the same service interval based on time and not volume of water processed.
- Stage 1 – Sediment filter, recommended change 6 months.
- Stage 2 and 3 – Carbon filters, recommended change 6 months.
- Stage 4- Membrane, recommended change 2-5 years.
- Stage 5- Carbon in-line filter, recommended change 6 – 12 months.
Various sites, including this one (WaterFiltersOnline), indicate to replace the RO membrane when rejection falls below 80%. That link also has a calculator for those that prefer not to math.
The rejection formula is:
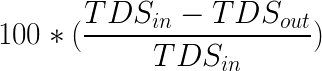
Since I care about the overall PPM and not necessarily the rejection rate, I’ll probably replace all of the filters when I see a PPM close to 20. Using my average inlet PPM of 350 as a guideline, that would put me around 94% rejection. I’d consider that really early for normal recommendations, but since I’m going on 2 years with the original set of filters, I can stomach ~$50 for a new set of filters every few years.
Below is my installation plot, but with a trace for rejection added.
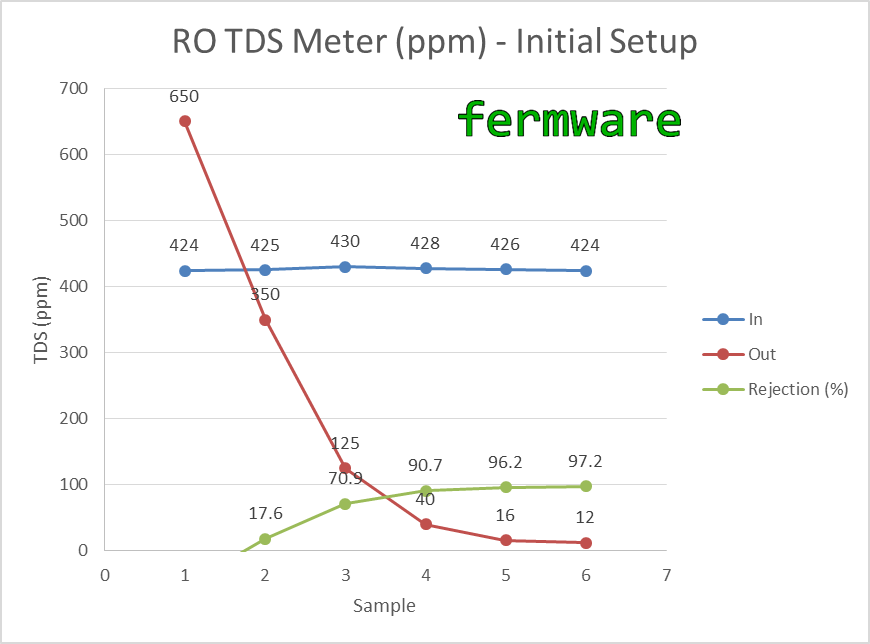
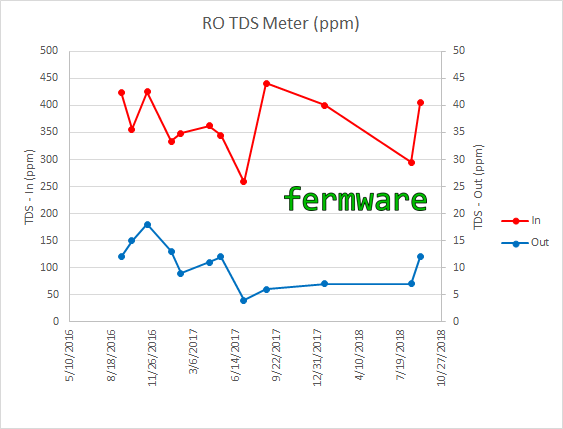
You can see the ramp up of the rejection rate as particulate in the new filters gets expelled from the system and the filters start doing their job. I did not show a chart of my long-term rejection rate, since it has been at 97% +/- 2% since I’ve been tracking it.
Conclusion
Other benefits