Category Archives: Chemistry

Beersmith3 BJCP Water Profiles

If water additions are somewhat of an enigma for you or you just don’t like to have to think (like me), I’ve worked out a method to quickly add recommended water profiles for most every BJCP style.  If you’ve been using Beersmith as your brewing software since version 2, you’ve probably been aware of the water profile tools.  Beersmith3 has made a big upgrade in that you can specify your target water profile and the salt additions will be calculated automatically.

Difficulty: level_2

Due to messing around with software files and probably some confidence if you haven’t edited files before.

Time Required

About 15 minutes, including the software download.
Affiliate Links

Background

Since the city water profiles are not what one should target when creating their brewing water, and the novice water chemist might be unsure if their lager should follow a yellow full or amber balanced, I’m pulling some resources together to take some of the guesswork and thinking out of it.  Did I mention, I don’t like to have to think?

One of the great features of Beersmith is that most of the files containing data are BSMX files, which are modifications/evolutions of Beer XML files.  What is great about this, is that files can be edited in a standard text editor.

http://www.beerxml.com/

In this post, I’ll show you how to quickly add them through a text editor, rather than adding them manually.  At the end of this small project, you’ll have added water profiles corresponding to most every BJCP style to Beersmith.

2018-OCT-23 UPDATE:  In the initial post, I had generated water profiles based off of one of my sources that was itself based on the 2008 styles.  I’ve gone through and done my best to match up appropriate water profiles for the additional styles in the 2015 BJCP guidelines.  I now have available a 2008 file and a 2015 file.

To avoid confusion in BJCP updates, I’ve added the year of the style to the names.  This will be especially important for users that want to access both the 2008 and 2015 styles at the same time.

As an example of the title changes:

03B. Oktoberfest Lager (2008) – Acidify: Maybe

would now read

06A. Marzen (2015) – Acidify: Maybe

Here are some good resources to understand the BJCP styles.

This would be your first stop

BJCP Style Guidelines

Then review this document to understand the differences from 2008 to 2015.  I hear there are some more small changes coming in 2019…

2008 Categories vs 2015 Categories

What I will not be covering in this post is a discussion or comparison of accuracy between water calculators.  Currently on various online social platforms and forums, there are spirited debates on the merits of each water addition calculator, especially the mash pH estimation tools.

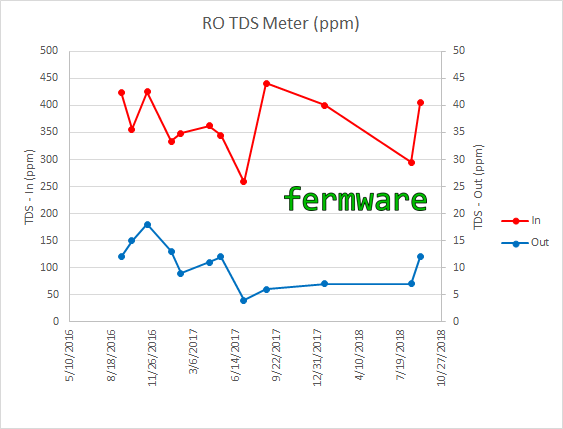
I also have to give my opinion/recommendation on water here.  If you are relying on a water report you got for your home or using a city water report, I would strongly urge you to stop or at least allow for wide variation.  A neighbor down the street works for the Indianapolis water department and he was telling me that they are constantly changing water sources due to different variables.  Sometimes, multiple changes in a day.

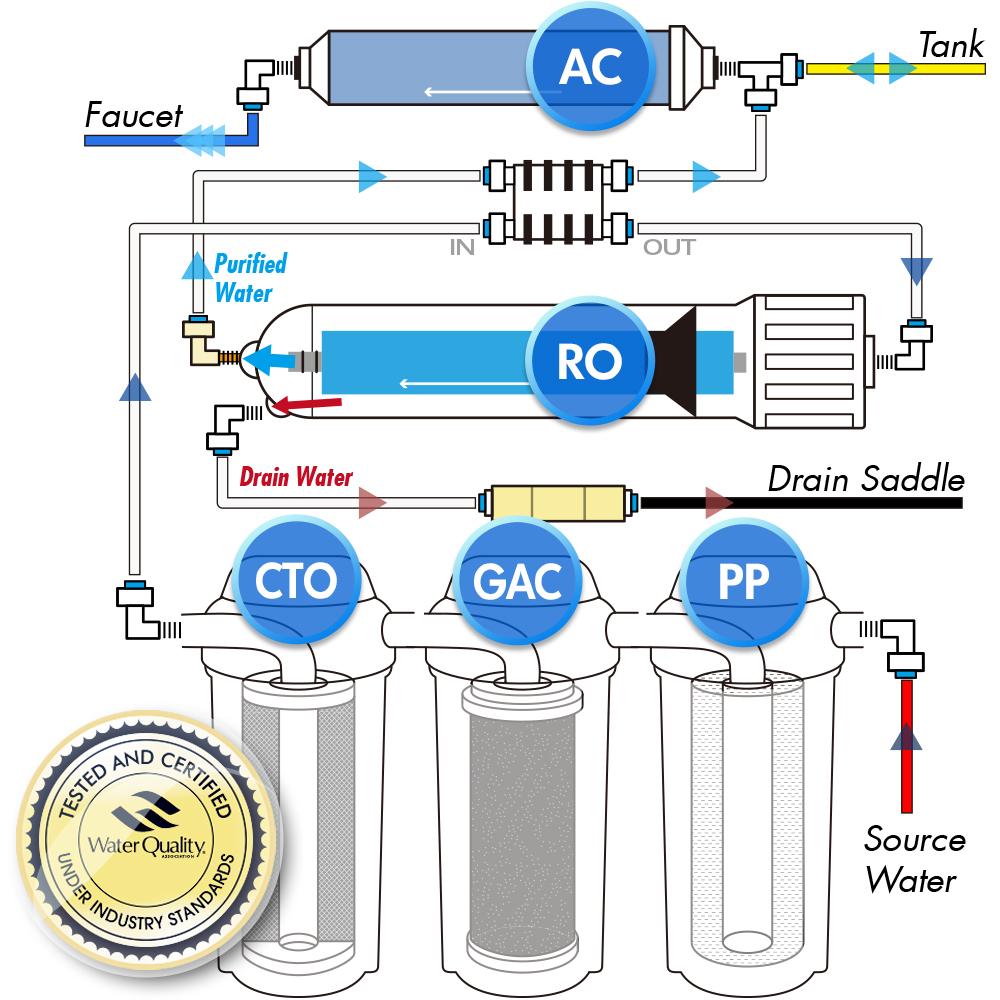
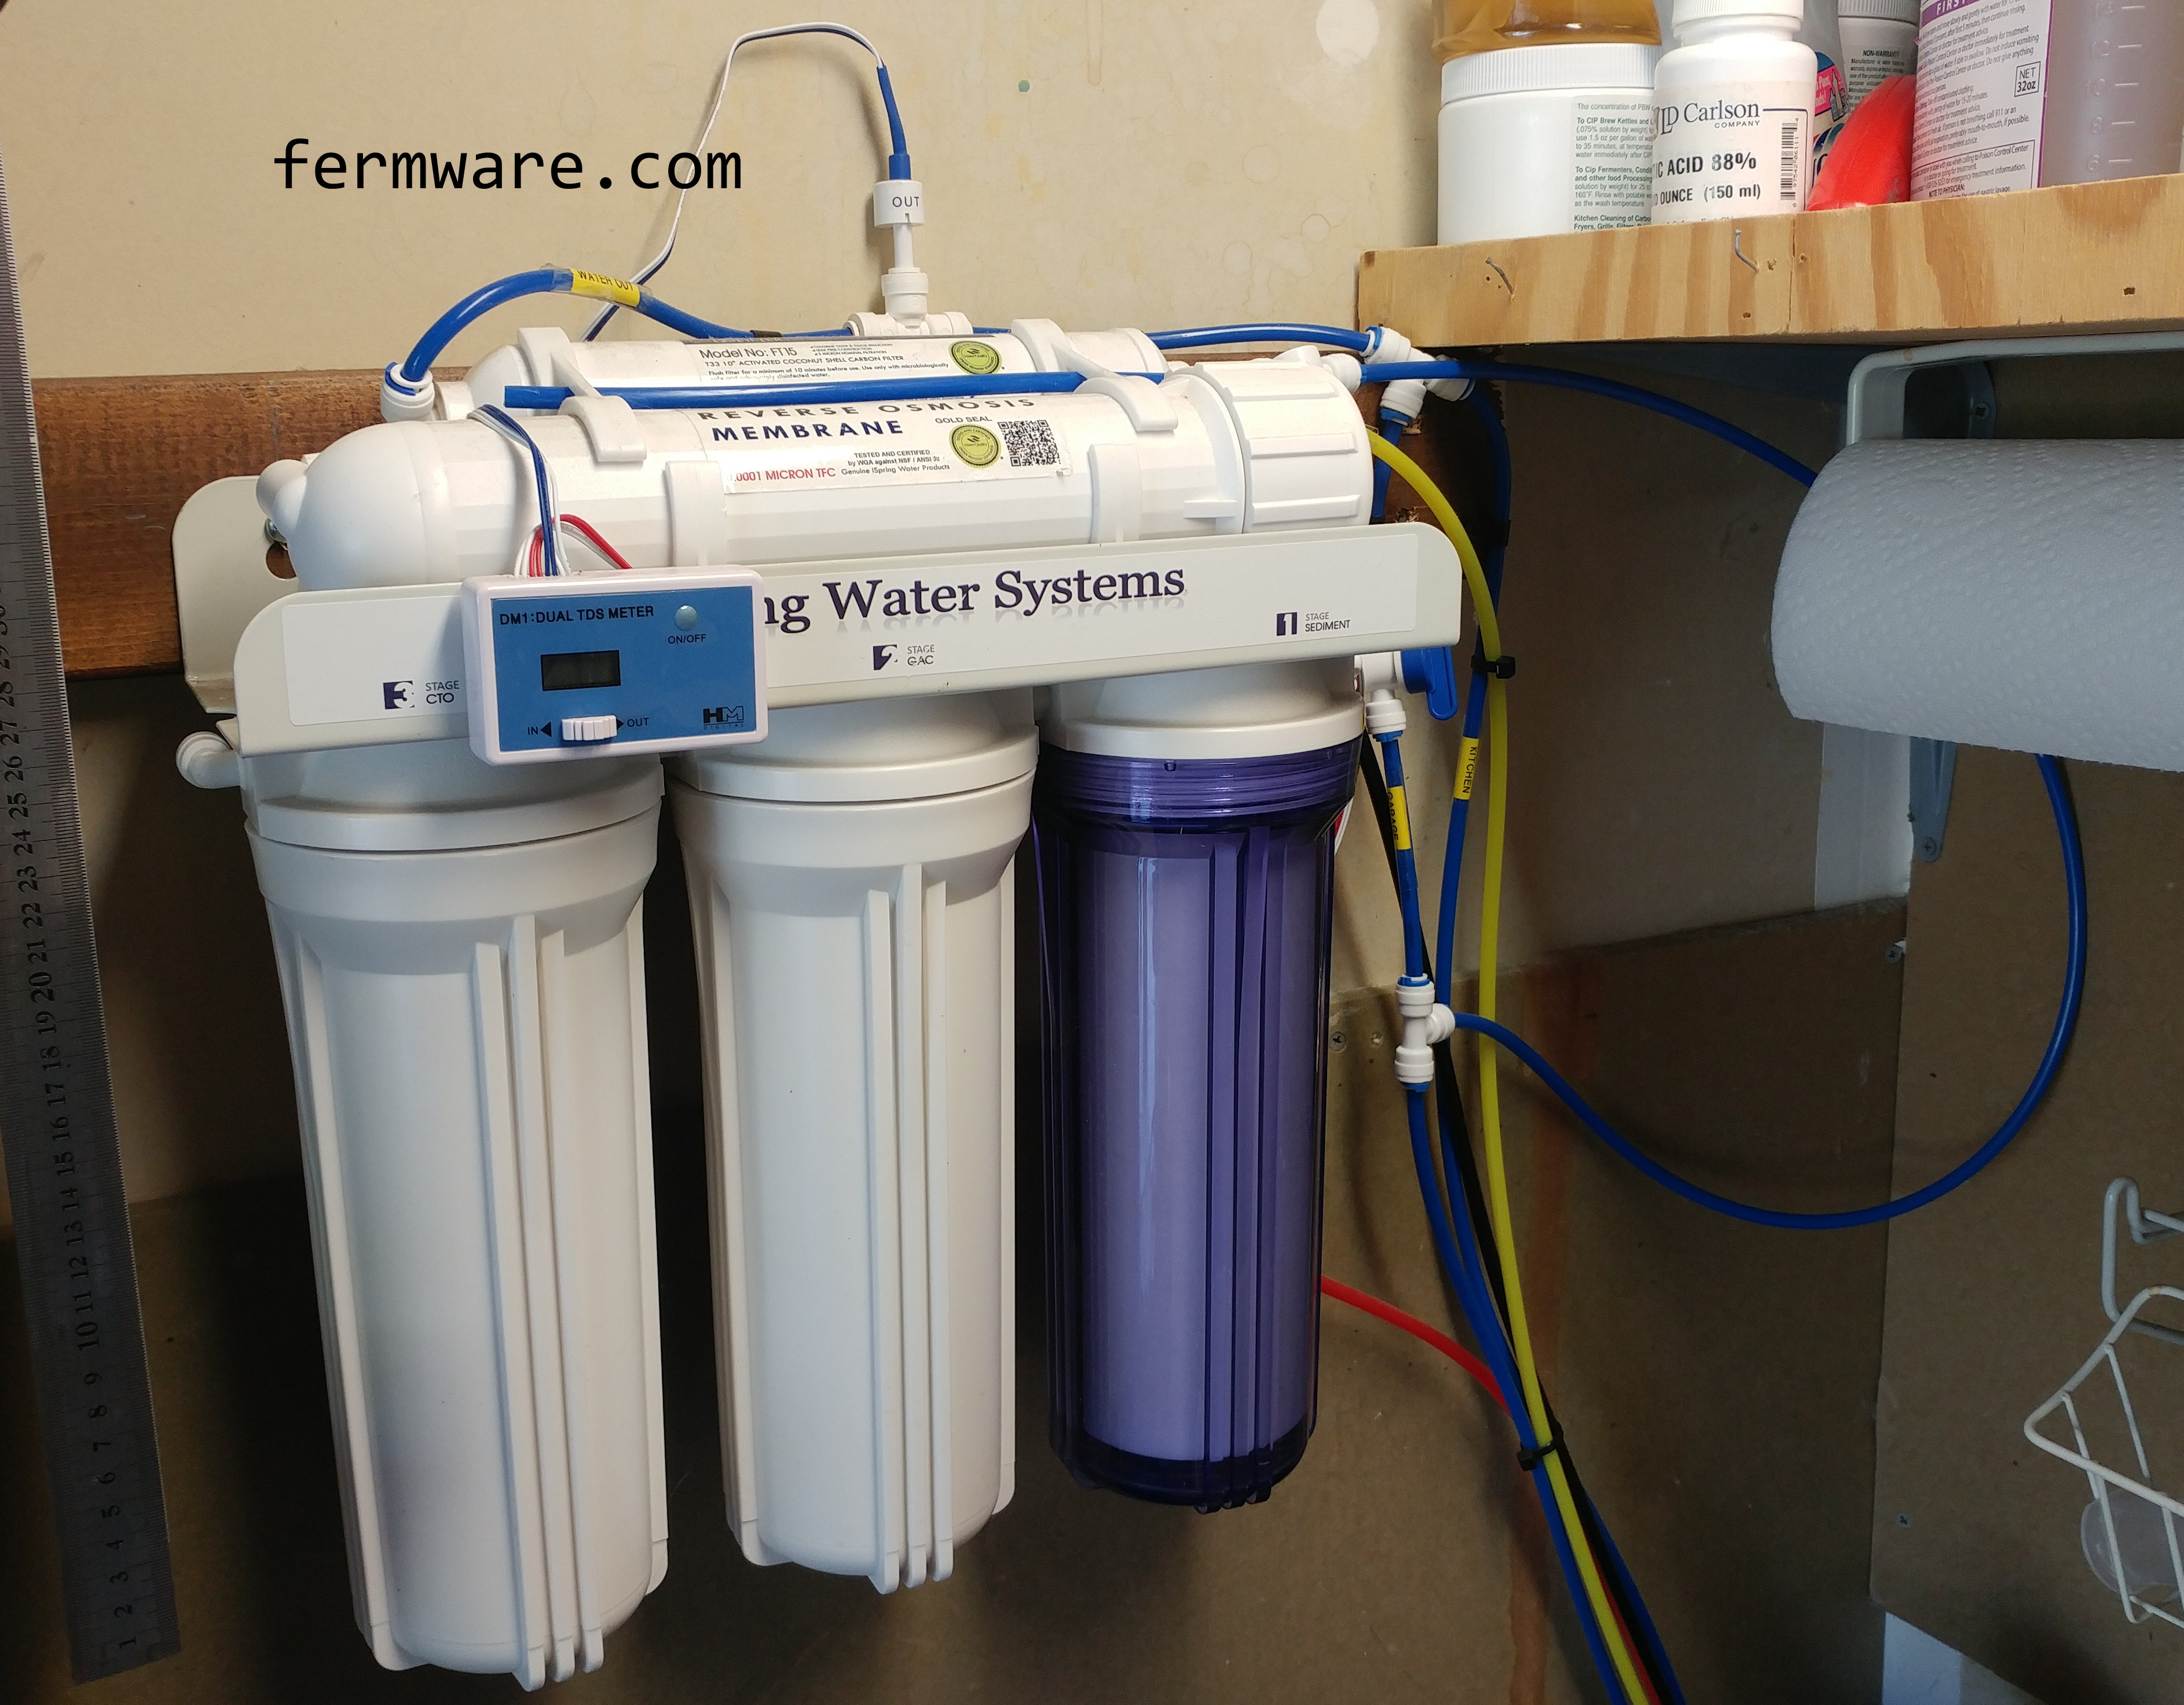
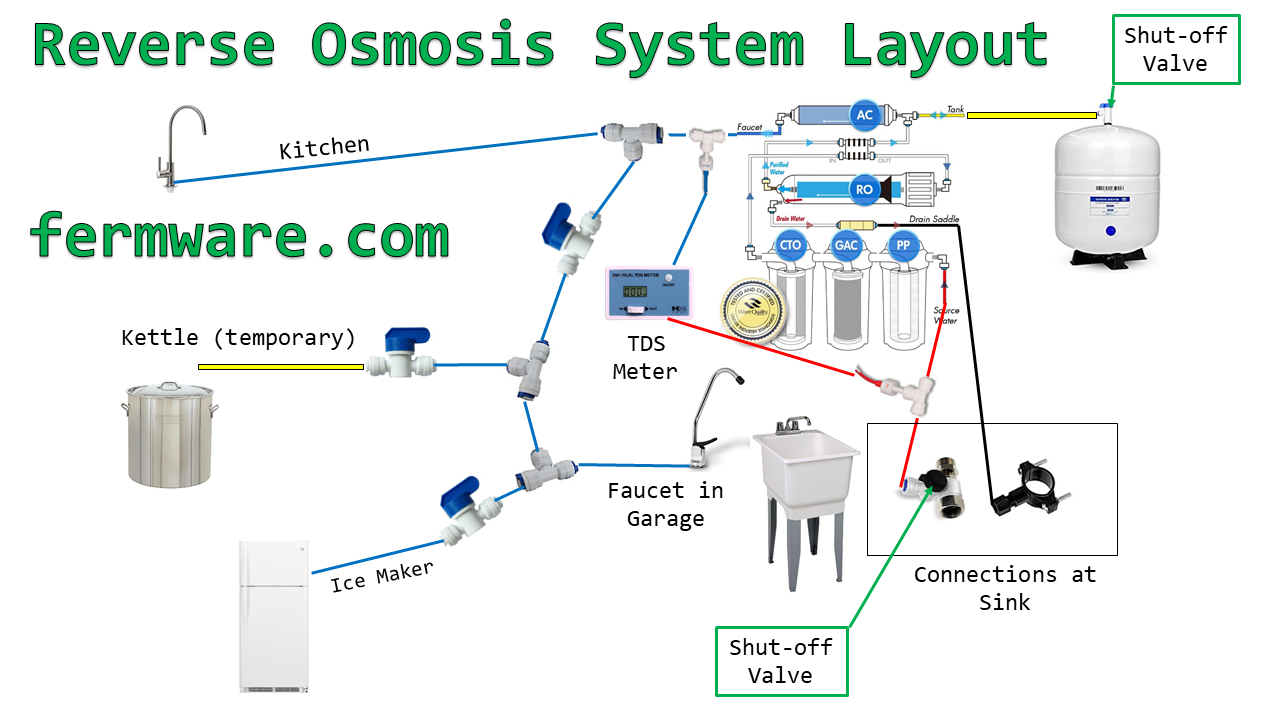
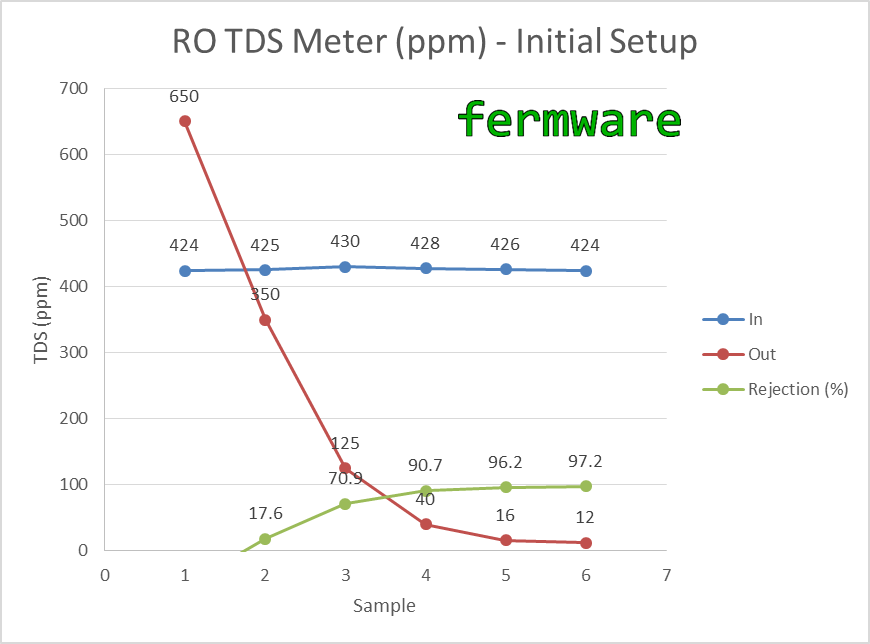
That cemented my decision to just purchase an RO system (See the post on RO System Installation here) and not mess with water reports ever again.  Unless you are measuring your water profile with each batch or you have an extremely consistent water source, I would recommend going RO or purchasing DI or RO water from a store.

I also have to give mega credit to my two sources for the values used in my file.

Importance of Brewing Water

One of the most concise and understandable water articles I’ve ever read was an article written by Thean Leonard Kruger (aka KRUGER_BREWER) on homebrewtalk.

https://www.homebrewtalk.com/importance-brewing-water.html

This article was the inspiration and source of my values for my water profiles.
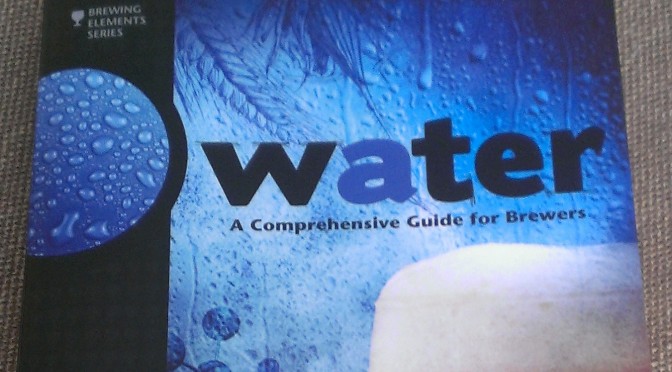
THE Water book

I also used and would consider a must-own is the book WATER: A Comprehensive Guide for Brewers by John Palmer & Colin Kaminski.  (Brewers Publications).  I’ll reference information from the 1st edition in this post.

All I’ve done is work out how to edit the Beersmith water.bsmx file to accept values without manually entering them one by one.

If you enjoy this post, please consider supporting this site by clicking on and purchasing products through the affiliate links in this post and on this website.

Cost

Free software and your time

Tools/Materials Required

Any text editor will work
Notepad is one that is already packaged with Windows and is about as basic as you can get.
My favorite however is Notepad++

I’ve found it to be one of the best text editors out there and sometimes it is even better to write code in Notepad++ than the original software’s editor.  Best of all, it’s free.

https://notepad-plus-plus.org/

Follow their instructions for installation.

Text File for Insertion

Also needed will be my text file to insert into your existing water.bsmx file.  Further down in the post.

Basics: How to change or create water profiles in Beersmith3

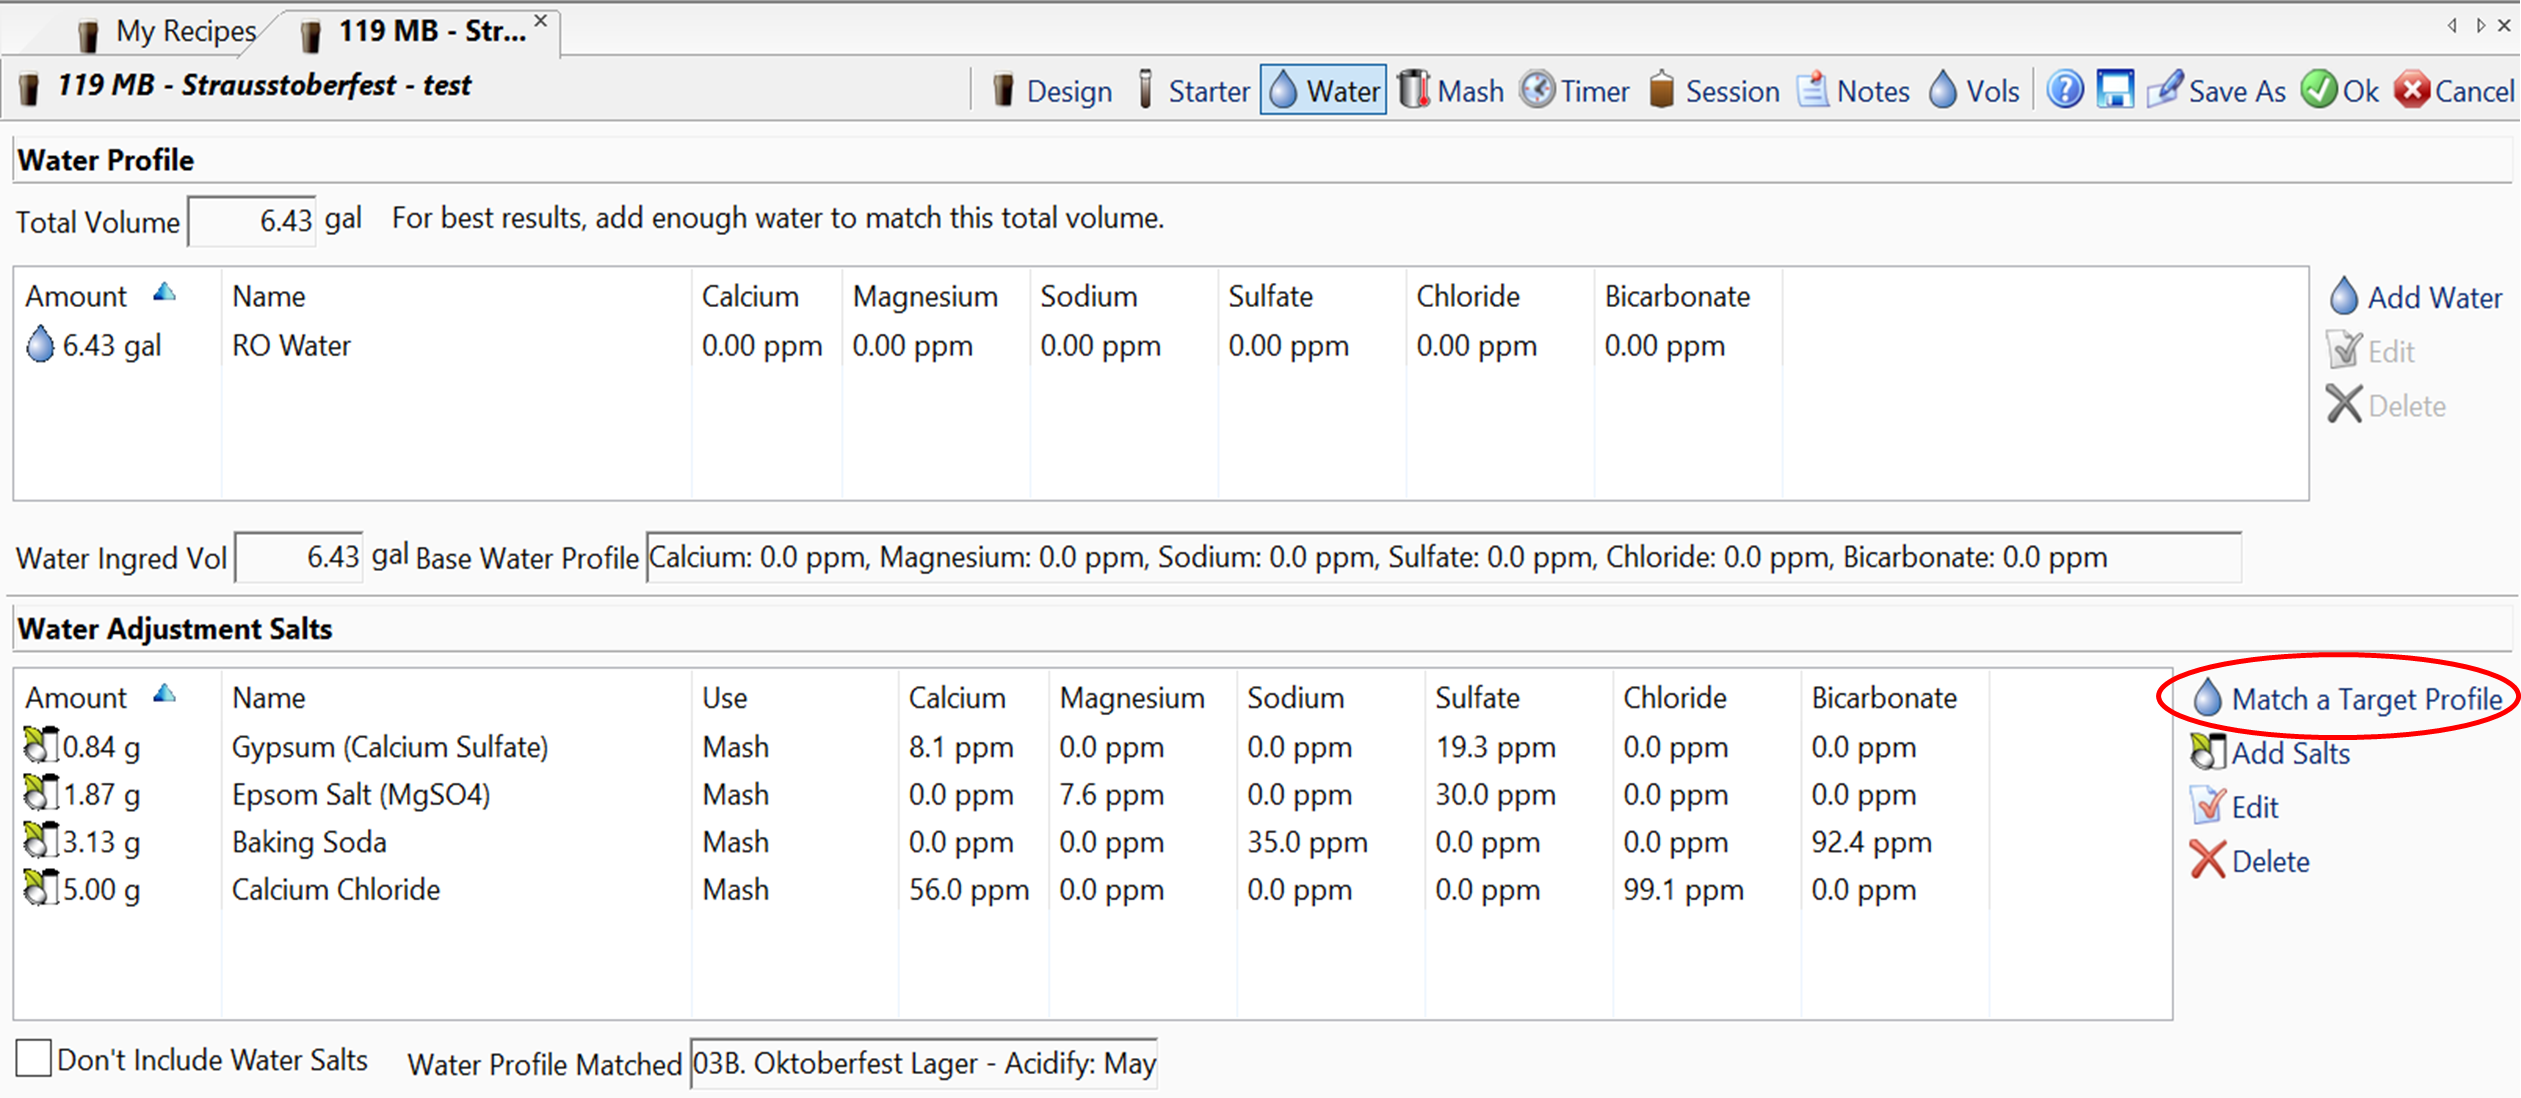
Unfortunately, Beersmith currently doesn’t have an easily accessible water profile tool like the mash, equipment and ingredient profile editors, so you have to go through an actual recipe to get there.  Keep in mind that once you select a profile, it will change your water profile too, so I suggest using a dummy recipe to do your water editing.

From your recipe, go to the water tab and click on “Match a Target Profile”.

Click on “Choose Target Profile”

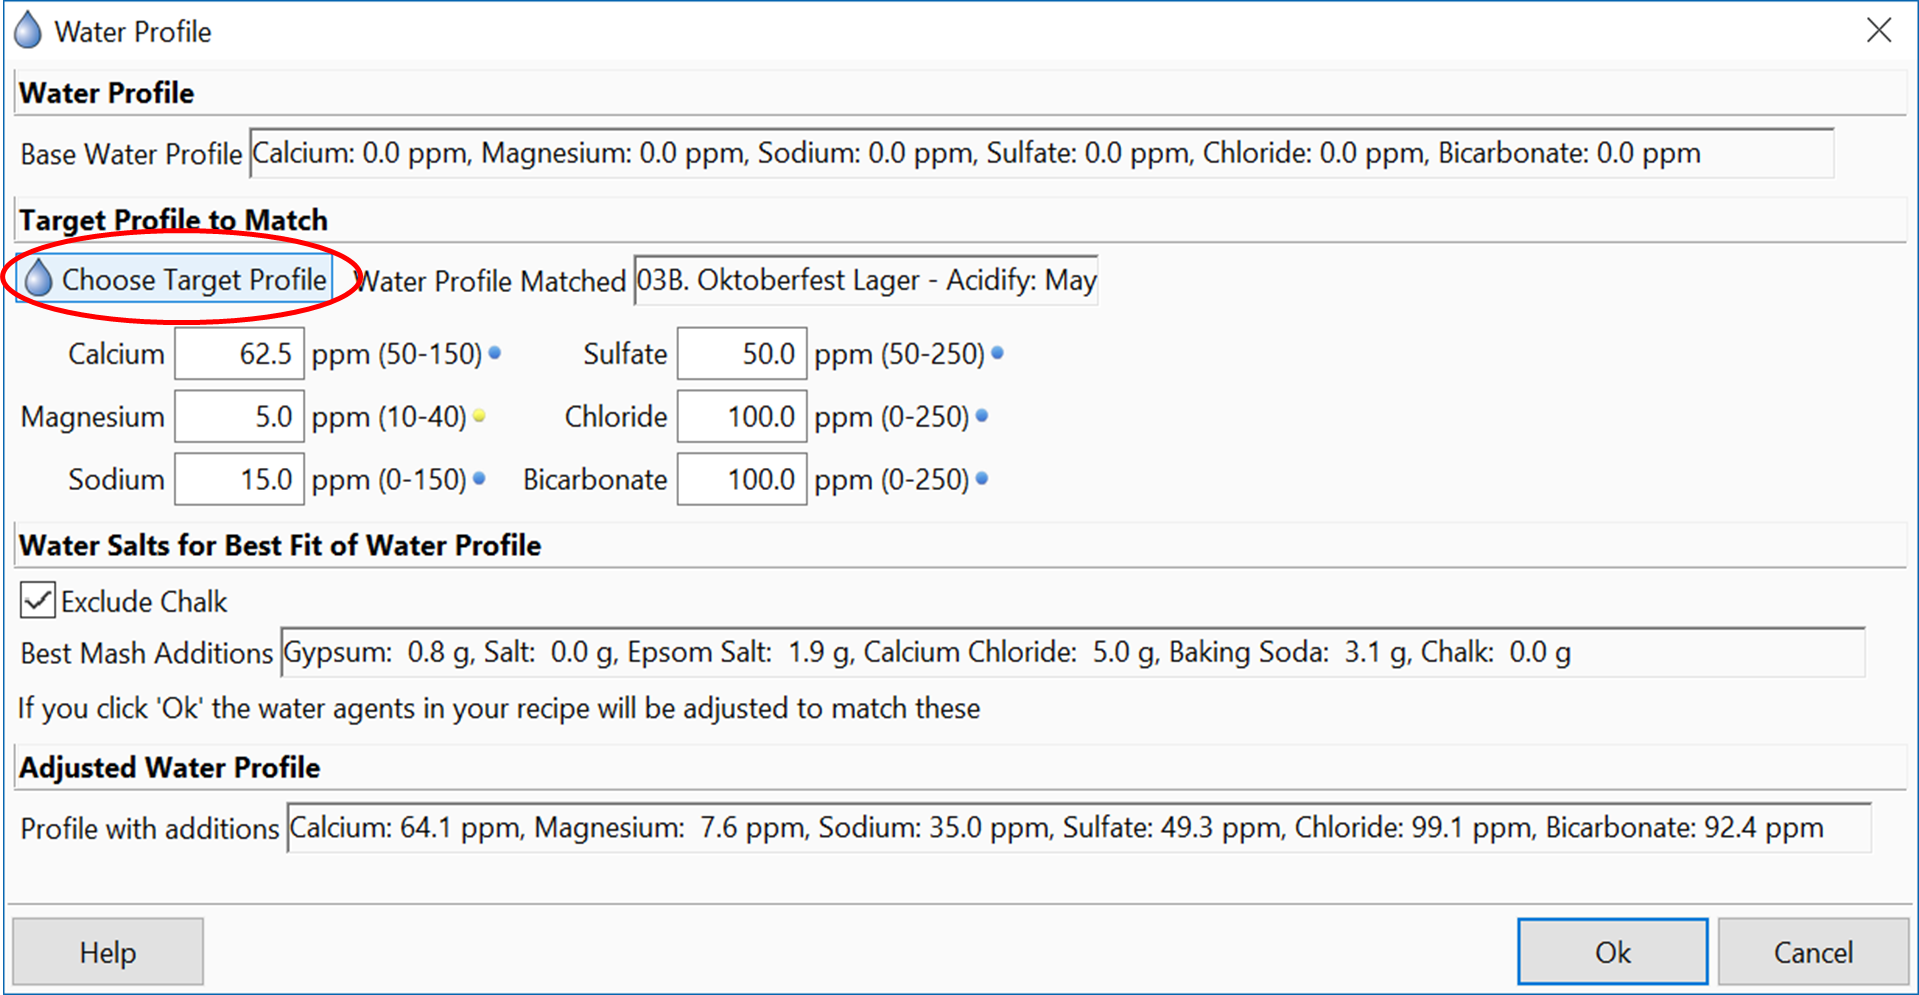
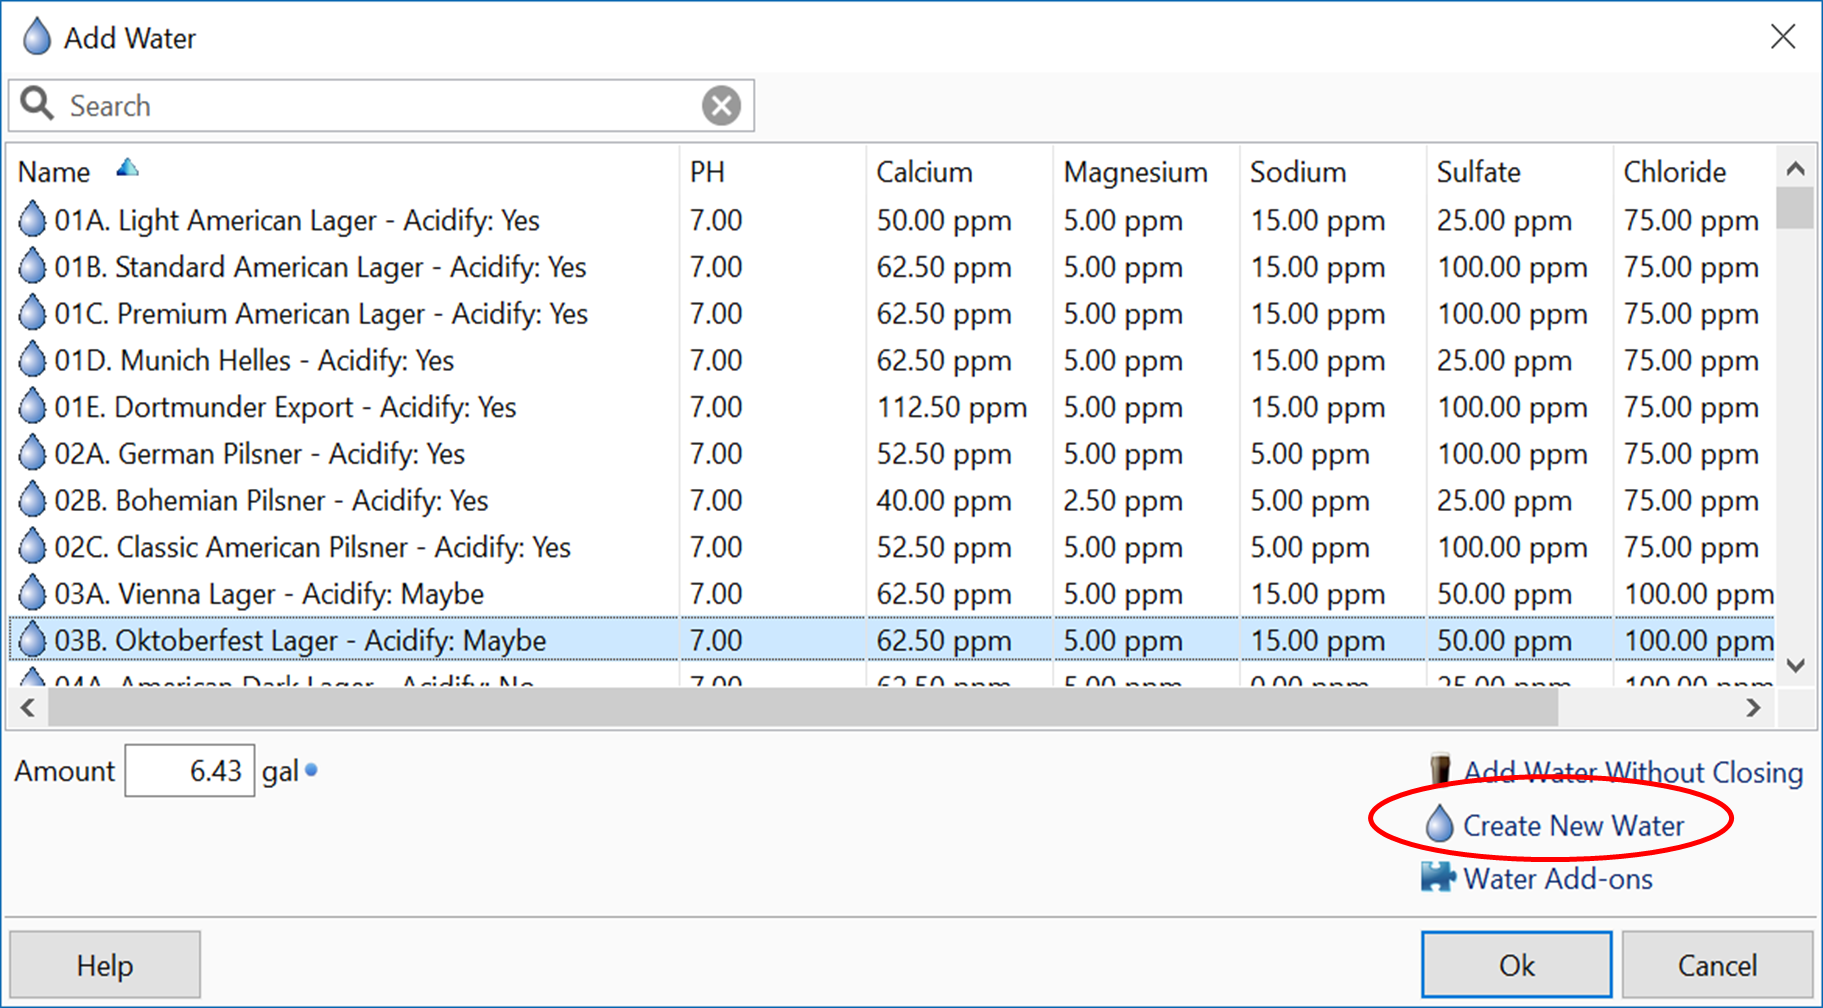
Then click on “Create New Water”

Now set whatever targets you want, a name, price and inventory if you choose to use those features.
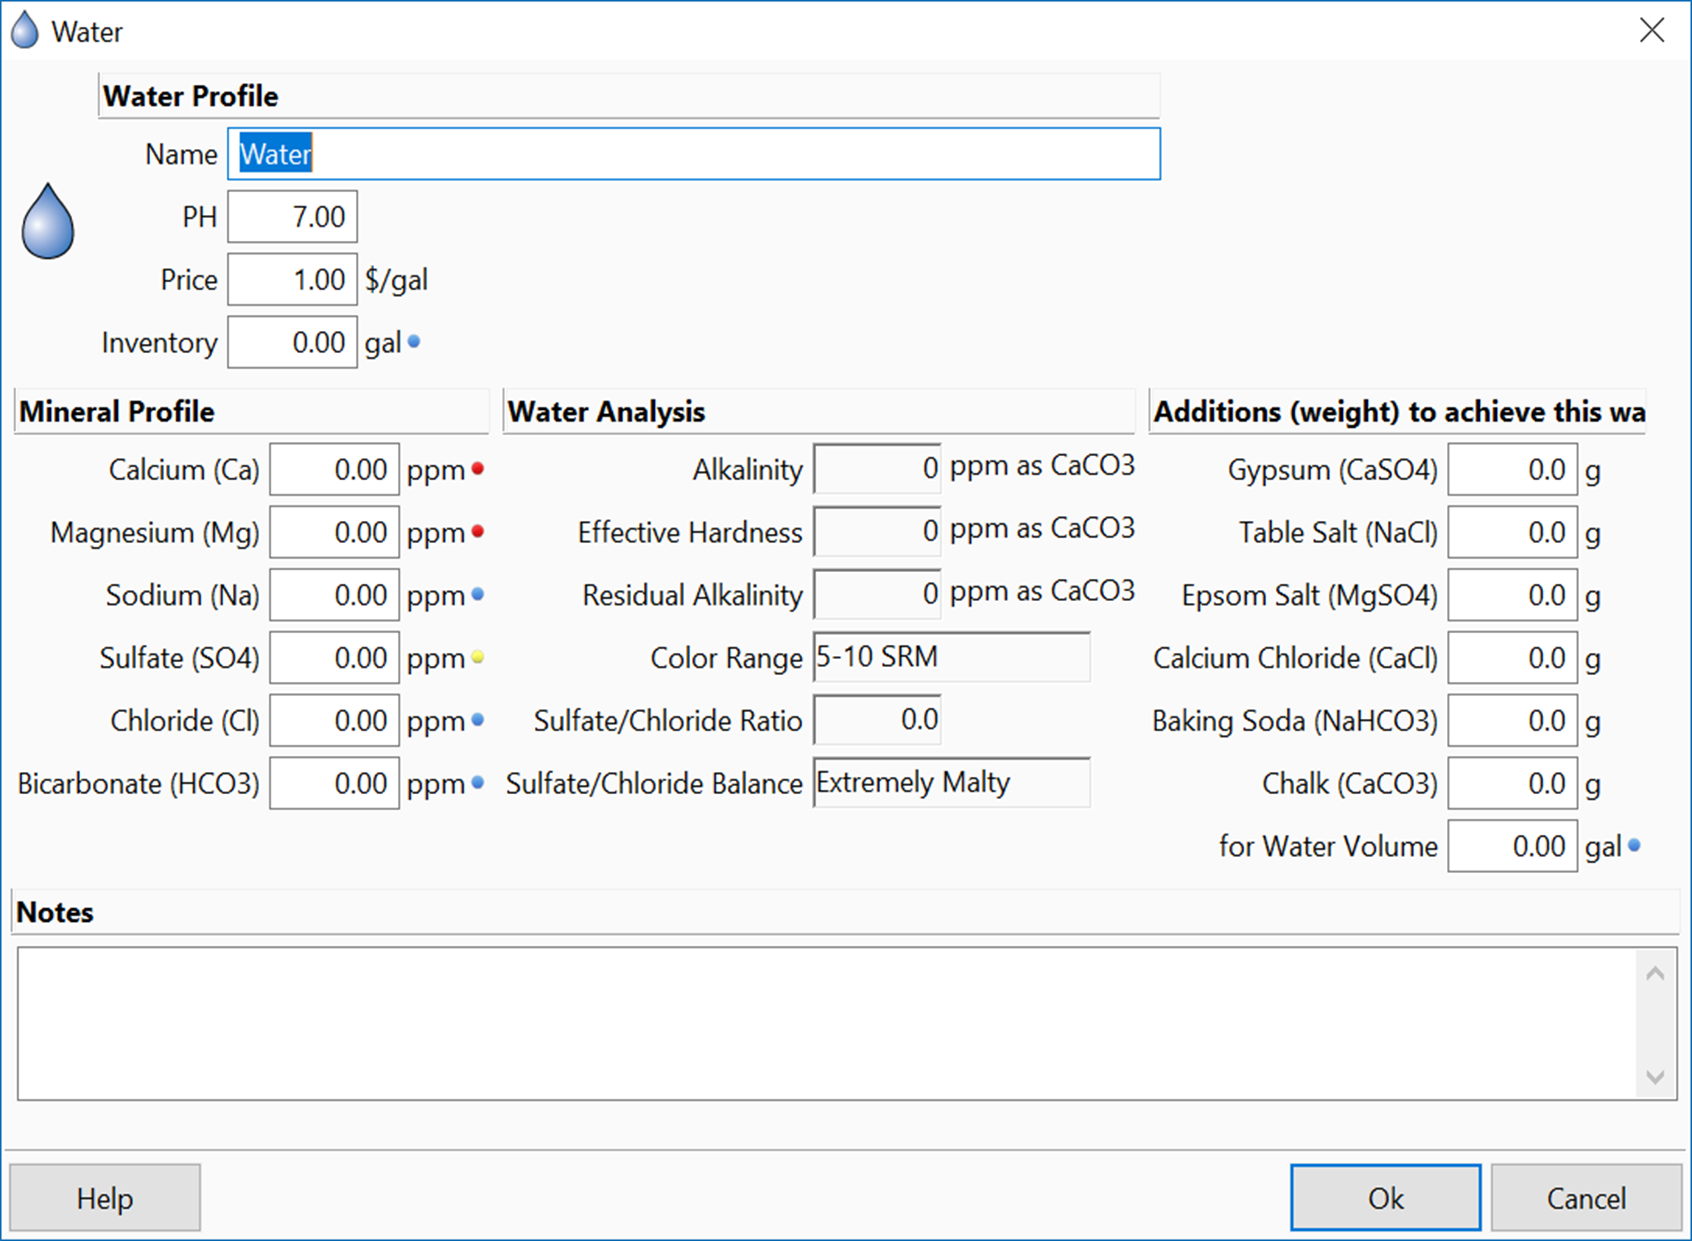
That’s it!

What’s Included in the Download here

In the book Water on pages 156-159, Palmer and Kaminski lay out the water profiles for different categories of beers, but it sill requires the reader to think.  The mineral addition columns don’t spell out the targets in the format typically used by most every single water calculator out there.  Also, the BJCP styles are listed, but again, requires the user to go back and reference this chart when they go to brew a new style of beer.

Kruger’s article on homebrewtalk made an excellent start with extracting and listing maximum and minimum ranges for each mineral value and tying them to a specific BJCP beer style.  He also ordered them in the exact format that the water calculators use.  I’m assuming that each addition doesn’t necessarily have a linear relationship, but what I did was then take the averages of those max/min values to nail down one target number for the water profile.  Once you see the text file, be my guest to move your target values around.

Paraphrasing the data I’ve taken from Water are the notes on page 155 about acidity for each style.

Yes: acid additions are needed to hit target mash pH
Maybe: acid additions are generally not needed, but may be helpful
No: acid additions are generally not needed
If you want more detail, please buy the book.  It should be on your bookshelf anyway.
The way Beersmith handles the information in the file, the notes are pretty much only readable when you select the target water profile.  I did add the acidification recommendation to each profile title, that way the user has some tieback without having to reload the water profile.
Download file

I’ll start this off as a v1, since after I post this, there will inevitably be some errors or a water expert will weigh in and point to a better method.

2018-OCT-23 Updates: I’ve created a new file that contains my best estimations of appropriate water profiles for the 2015 BJCP guildelines.  Notes on my methodology are after the download button for the 2015 file.  I also somehow missed Russian Imperial Stout on the 2008 file, so that has updated as well.

2008

Did not include 20, 21 and 23, all of which should use the base style water profiles
20 Fruit Beer
21 Spice, Herb or Vegetable Beer
23 Specialty Beer

2015

Did not include 28-34, all of which should use the base style water profiles
28 America Wild Ale
29 Fruit Beer
30 Spiced Beer
31 Alternative Fermentables Beer
32 Smoked Beer *Except for 06B. Rauchbier
33 Wood Aged Beer
34 Specialty Beer

New Style source profile

03A. Czech Pale Lager: Used 03B. Czech Premium Pale Lager profile
03C. Czech Amber Lager: Used 07A. Vienna Lager
03D. Czech Dark Lager: Used 08A. Munich Dunkel
04B. Festbier: Used 04A. Munich Helles
05A. German Leichtbier: Used average of German Pils and Munich Helles
07C. Pale Kellerbier: Used 04A. Munich Helles
07C. Amber Kellerbier: Used 07A. Vienna Lager
10B. Dunkles Weissbier: Used 08A. Munich Dunkel
12A. British Golden Ale: Used 18B. American Pale Ale
12B. Australian Sparkling Ale: Used 18A. Blonde Ale
15C. Irish Extra Stout: Used 15B. Irish Stout
16C. Tropical Stout: Used 16A. Sweet Stout
17A. British Strong Ale: Used 17B. Old Ale
22B. American Strong Ale: Used 22C. American Barleywine
22D. Wheatwine: Used 22C. American Barleywine
26A. Trappist Single: Used 05D. German Pils
27A. Gose: Used minimums
27A. Kentucky Common: Used 09D. Irish Red
27A. Lichtenhainer: Used minimums
27A. London Brown Ale: Used 13B. British Brown Ale
27A. Piwo Grodziskie: Used minimums
27A. Pre-Prohibition Lager: Used 02A. German Pils
27A. Pre-Prohibition Porter: Used 13C. English Porter
27A. Sahti: Used minimums

First caution

Do remember, the downloadable file is a text file (.txt).  It is not a complete water.bsmx file.  The purpose of this post is to show the reader how to insert this pre-formatted data into their water.bsmx file.

**DISCLAIMER**

I am not responsible if you make a wrong step and somehow render your Beersmith installation useless.
Please make a backup of your water.bsmx file before editing it, better yet, make a backup of your entire Beersmith installation folder

How File is Constructed

Most readers familiar with programming or XML will be right at home here.  There isn’t anything to difficult to discern.  It’s pretty intuitive.

Header

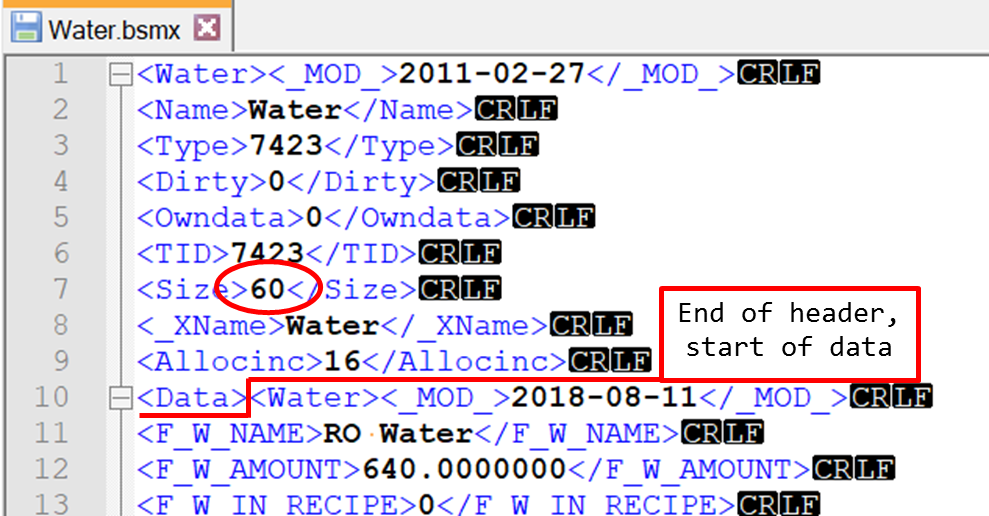
This contains information that Beersmith reads when opening the file.

You can see in my example the <Size>60</Size> line.  This will be important to edit when you add my text file.  This tells the file how many entries to read.  If you get this wrong, Beersmith will either strip out one of the entries or I don’t know what else it could do.

This also shows the <Data> tag to start the entries.
The CR and LF rectangles are the symbols shown in Notepad++ to indicate end of lines.

Body / Individual Water Profiles

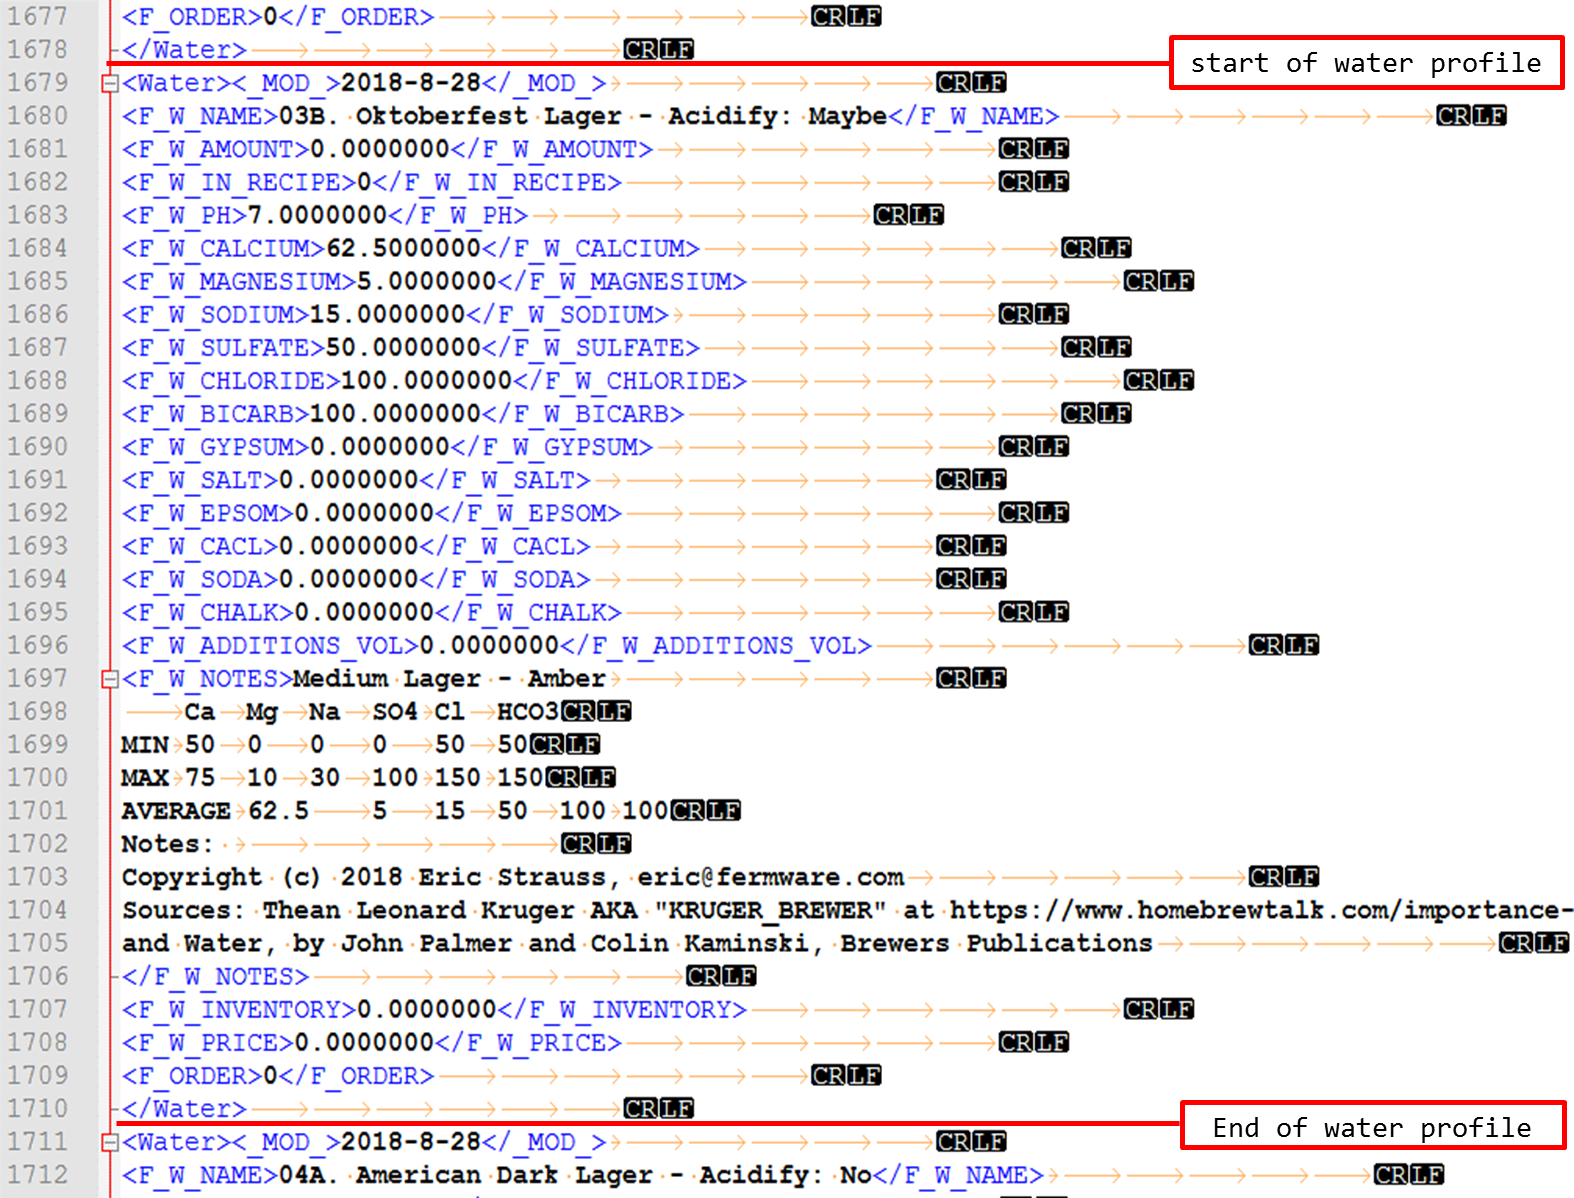
Each water profile begins with <Water> and ends with </Water>

I don’t know what tags are actually required, so I included all in my file.

You can see the CR and LF symbols again.  Also shown are orange arrows, which are the tab symbols.  It appears that Beersmith cleans the unnecessary ones up after opening, reading and saving the water file.

Footer

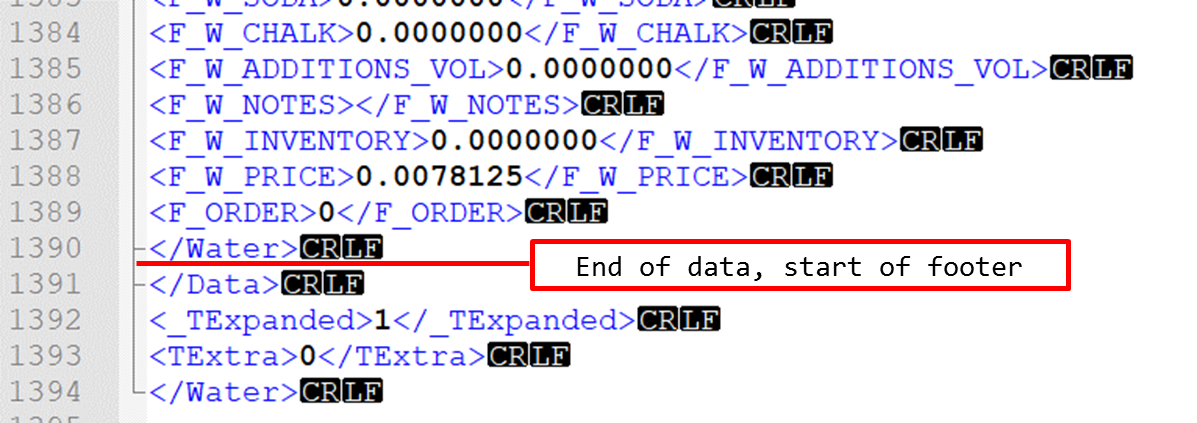
The footer is also only a few lines and helps to close out the file.

Make sure you don’t have any additional information after the closing data tag </Data>.

Water Profile File Modification (what you are here for!)

Here is the quick method for those that are confident in what they are doing
  1. After making a backup of your water.bsmx file
  2. Without Beersmith running
  3. Open the “water.bsmx” file
  4. Increase the <Size>some number</Size> value in the header by the number of new entries (add 73 for 2008, add 100 for 2015)
  5. Insert my new text data at the end of the last </Water> profile
  6. Save the file
  7. Open Beersmith and using a test recipe, check that all of the profiles have been loaded
Here is the longer detailed set of instructions
  1. After making a backup of your water.bsmx file
  2. Ensure Beersmith is not running
  3. Browse to and open your “water.bsmx” file with your text editor.
    1. Should be located in your Beersmith3 installation folder
  4. Tips for Notepad++
    1. to get easily readable formatted text, Language menu > XML
    2. When editing Input/Output files, I also turn on the View > Show Symbol > Show All Characters
      1. This way, I can see if there are any unintentional non-visible characters that could break the file
  5. Find the <Size>some number</Size> tags at the header of the file and increment them by the number of new entries.  With my version 1, that would be (add 73 for 2008, add 100 for 2015).
    1. Example: If it currently shows <Size>30</Size>, you should change it to <Size>103</Size>
    2. 30 + 73 = 103
  6. Now go to the bottom of the file to the last closing tag for water </Water>
    1. take note of this line number
  7. Insert my entire text file in this spot
  8. Double check the beginning line where you inserted the file and the end to ensure there are no empty lines
  9. Save the file
  10. Open Beersmith and using a test recipe, check that all of the profiles have been loaded
    1. Beersmith does seem to do some cleanup when it opens or closes the file and removes any unnecessary tab characters that were in the file to begin with.

Conclusion

Since I am not a water expert, I hope this helps other non-water experts.  So please don’t ask me any water chemistry questions, I’m just a messenger here.  If you are a water expert, I hope I’ve presented all factual or at least close enough information that will help brewers with this sometimes confusing and intimidating subject.  Regardless of what camp you are in, I would welcome feedback for future improvement.


Reverse Osmosis System Installation

At some point in your brewing career you are going to become interested in taking your water chemistry to the next level.  As part of that, you might come to the realization that you want to improve the quality of your water and stop using the water from a garden hose or you might want to cut down on the inconvenience of having to go to the store to get your water.

Difficulty: level_3

If you have made it this far, please continue.

Time Required

A few hours to a day depending on how expansive you wish to make your system.
Affiliate Links

Cost

$150-400, dependent on how complex you want to make it and how much capacity you want.  After it was all completed, I had close to $300 in my system.

I chose the iSpring RCC7 5-Stage system and I would  highly recommend it.

Background

When I started brewing, I was buying Ice Mountain brand spring water from the grocery.  In my opinion it was the best tasting water, so I used that for my brewing water.  I then started dabbling in water chemistry, so I got an inline charcoal filter for my home water and got a WARD labs test done and used those results as absolute fact.  It is well known that the water in Indianapolis is extremely hard.

The WARD lab report showed a TDS value of 501 and a Total Hardness of 334. Of note, I submitted two samples and the charcoal filter did nothing for any of the measured levels in the water.  I was naive and assumed that it would.  They really just filter the chlorine in the water.

I still would in most cases split my home water with a 50:50 mix of Ice Mountain and my home water.  Of course my desire to simplify my process, I wanted to take one less trip to the grocery store out of my brew day prep.

I had mostly decided to take the leap of installing an RO system.  It was then one day having a conversation with a neighbor who works for the Indianapolis Water Company that cinched it.  He was talking about the variety of sources for water that are available to Indianapolis Water and that those sources change often, even daily.

Well, I might as well throw my water report out in the trash right?

One thing I value in my process is repeatability.  I don’t want to brew a batch of beer one time, then brew it again a year or so later and have it be completely different.  One variable I can control is the water used in my beer.

The best way to do that is to strip the water down to nothing, then rebuild it with mineral additions.  One could argue that this is more complicated than just buying your water from the grocery store or the tap.  Sure, but I heard in one podcast, paying attention to your water is the difference between a beer scoring 30 and one scoring 40.  Plus, now that I’ve got my mineral additions routine worked out, it’s really like weighing out your hops, so no big deal.

Mineral additions and how to do it is not covered in this post. However, if you do wish to go with a recommended profile and use Beersmith3, I have another post Beersmith 3 BJCP Water Profiles that shows how to add recommended water profiles for 72 BJCP water styles. This post will show how to quickly add these profiles to Beersmith3 so that you can use the built-in water profile mineral addition calculator.

This post will show

  1. The basic components of a RO (Reverse Osmosis) system
  2. Some of the considerations when choosing a system
  3. A brief explanation of how they work
  4. How I chose to install my system

If this post helps you in selecting a RO system, please consider supporting this site by clicking on and purchasing your system or other products through the affiliate links in this post and on this website.

Basic Components of a RO system and what I chose

Filtration
Generally the filters are contained in one assembly.  I’ve seen anywhere from 3 to 7 stage filters.  The system I chose was a 5 stage.  It seemed to be the most common and my most important criteria was that I would be able to get replacement filters easily and economically.  I didn’t want to have a $45 filter that would have to be replaced every 6 months.
Holding tank
These come in various sizes.  The purpose of the tank is to store water for on-demand usage.  With a limited flow rate for the filters to do a good job, you can’t just keep the faucet going non-stop.  My system is rated at 75 gallons per day, which is just over 3 gallons per hour or just under 6 ounces per minute.  Keep in mind that the size of the tank dictates how much water you can have on hand at any time.  Also the quoted size of the tank isn’t necessarily how much water you’ll have available either.  Mine is a 4 gallon tank that can hold 3.2 gallons.  I’ve seen a 14 gallon tank that holds 10.7 and a 20 gallon that holds 14 gallons.
Faucet
Pretty self-explanatory.  You need some way to get the RO water.
Tubing
There is pretty much a standard tubing size used for RO systems that appears to be the same as ice-maker tubing.  It comes in a variety of colors, which you can use to your advantage if you like to keep things organized and color-coded.

Considerations before purchase

  • Permanent or portable?  I had seen some of the portable systems and considered those, but since I was looking to spend a decent amount of money on an RO system, I figured I might as well enjoy the water beyond brew days and install a permanent system.
  • Number of filter stages (more is better??).  I chose a 5 stage system.  The more stages, presumably a greater filtration level.  My system quoted filtration down to 0.0001 microns.
  • Availability and cost of filter replacements.  Mine uses a standard size, but I’ve seen some that use smaller filters or larger capacity systems that use more expensive longer filters.
  • All-inclusive kit.  Most contain every component you need, but make sure you know what you are getting.  Some come with tubing, some don’t.  Mine was very complete with everything needed, except common tools.
  • Holding tank size.  Mine came with a 4 gallon (3.2 available), but I would prefer at least a 14 gallon that would have 10.7 gallons of RO water on hand at any point in time.  Only having 3.2 gallons available to dispense at a time, means that when preparing for a brew day, I must empty the tank twice to get enough water for my all-electric Brewer’s Edge Mash & Boil’s 4 gallon batch sizes.
  • Transparent filter cover for first stage.  I liked this feature in the one I purchased, because it allows me to see when the filter will turn from a new white color to brown and rusty or whatever it will turn to.
  • Daily throughput.  Again, decide what your needs are.  Ours is just for brewing and drinking water at two faucets.  75 gallons per day is completely sufficient for us.  If you are starting a nano-brewery, you’ll probably need more.
  • Do note that just like your beer tap lines, the further away you are from the holding tank / RO unit, you’ll experience much lower flow rates. Remember the concept of head loss from kegging 101? At our kitchen sink, the flow out of the RO faucet is just a nice slow flow, but in the garage, it’s almost like a hose!

How they work

Essentially water comes in from the source, and goes through 3 pre-filters, then goes to the reverse osmosis membrane where the water is then split into waste water and RO water.  Finally, it then either goes straight out to the faucet or goes to the holding tank reservoir.

Stage 1 Sediment Filter (PP): Sediment filtration extracts suspended sediment, dirt, rust, silt and sand

Stage 2 Granulated Activated Carbon (GAC): pre-filter reduces and removes: chlorine, volatile organic compounds (V.O.C), pesticides, nitrates, herbicides, tastes, odor, and disinfection by-products (Chloramines, THM, TCE)

Stage 3 Carbon Block (CTO): pre-filter removes Chlorine, then reduces or entirely removes Pesticides, Nitrates, Herbicides, tastes, odor, and disinfection by-products (chloramines, THM, TCE), Volatile Organic Compounds (V.O.C).

Stage 4 Reverse Osmosis Membrane (RO): This semi permeable membrane filters and rejects tiny impurities down to 0.0001 of a micron removing impurities such as colloid, heavy metal, dissolved solids, germs and other harmful substances. Virtually only water molecules and dissolved oxygen can pass through the Reverse Osmosis Membrane. The rejected contaminants are flushed to drain. The good output is now essentially RO water!

It is important to note that part of an RO system involves some waste water.  I haven’t measured it, but I’ve seen quotations that for every one gallon of RO water, the system will have rejected about 2.5 gallons of waste.  If you live in an area where water conservation is at a premium, you need to take this into consideration.

ASO Valve: This is the rectangular piece shown.  It shuts the system off when the tank is full to conserve water.

Stage 5 Post Activated Carbon Filter (PA): Post Carbon Final polishing filter for taste and odor.  The final clean water will either go to the faucet for immediate usage or will go to the holding tank for future on-demand supply.

Waste

After initially publishing this post, a user (rdcpro) on a Reddit thread had some good information on water recovery on commercial systems that I was unaware of. They indicated instead of a 25% recovery on home level systems, a commercial systems would be much higher (on the order of 90%).

A 25% recovery would mean that for 4 gallons input to the system, you would get 1 gallon of RO water (1/4 = 25%). They are able to achieve this with much higher pressures.

Here also is a much more technical link rdcpro provided on Reverse Osmosis systems if you are into that type of info.

https://puretecwater.com/downloads/basics-of-reverse-osmosis.pdf

If you have a hard time justifying the wastewater aspect of a home reverse osmosis system, you could buy a pressurized system or look for creative ways to use the waste water. Some internet searches note collecting wastewater in a rain bucket for plants or watering the lawn. Keep in mind the wastewater will have high levels of the things you don’t want for drinking water.

Tools/Materials Required

First off, the items required will depend on the RO system you select.  In general the following items will be helpful
  • Cordless drill
  • Mounting screws (may or may not come with your system)
  • Tube cutter
    • Optional, but makes things easier
    • This should be an essential part of your brewing toolkit anyway for cutting kegging and dispensing tubing
  • Water pressure gauge
  • Various RO couplers, Tee’s and valves
    •      
  • Label maker – if you want to place labels on the tubing as well
    • Great to have in the brewery anyway
  • Color coded tubing
  • Inline TDS meter (optional)
  • Additional faucet (optional)

My Installation

Here was the process to install my iSpring RCC7 system, but it should be a similar process to most other systems.

The first step in the instructions is to test the water pressure.  This system required an input pressure between 45-70 psi.  I measured mine somewhere in the mid-70’s at the time of installation.  A little on the high side, but ok to go.
Rather than install my RO system under the already overcrowded area under our kitchen sink, I decided to install ours in our garage.  The main benefits were that when I do go to change filters, it will be significantly easier to replace them when they are at chest height and any spilled water won’t be a big deal in the garage either.
I had to add an additional 2×4 to the wall to span 2 studs and provide a sturdy mounting surface for the filter array.  This also provided some additional space between the filters and the walls, which makes removing and reinstalling the filters much easier.
Plumbing Connections
First off is an explanation of how the push fit connections work in an RO system.  This video clearly shows what is happening inside the connector and demonstrates how easy they are to connect and disconnect.

It is recommended that if you have a water softener, to pull the RO system supply from the softened water, rather than your hard water.  The ion exchanged water coming from the water softener is apparently easier on the RO system than just plain hard water.  Fortunately, our laundry tub in the garage was already plumbed for soft water on the cold side, so I just had to tap into the supply.
My system also came with a feed water adapter, which made that easy.  It also has an on/off valve in case you want to service the RO system without turning water off to the house.  Fortunately, since my system came with color coded tubing, I was able to follow that scheme and just by looking at the hoses, I know each ones function.  BUT, because I like labels, among the RO water lines (blue), I added labels showing their destinations.  It just helps when needing to re-configure.
The other connection for the system is the waste water (black tubing), which requires drilling into your drain on your sink adding some foam and attaching a saddle connector.
Again, since it was in the garage, this was more accessible.
The last connection is the outlet.  This was the hardest part for me, since I decided to run a line to the sink in the kitchen.  I drilled a hole in the wall under our sink, which went to the crawlspace under our kitchen.  I then ran this line through our crawlspace on up to the kitchen sink.  The outlet also has branches to the ice maker for our garage fridge, an additional faucet on the laundry tub in our garage and a loose line that is used to fill my kettle (the whole point of this exercise).
For now, I pull out a longer extension for filling my kettle so I don’t have to move it once filled, but I’m considering going ahead and making that line permanent so that it’s one less thing I’m setting up.
picture of yellow line going to kettle – no picture yet
One of my favorite add-ons for my setup is the HM Digital DM-1 In-Line Dual TDS Monitor.  It is made specifically for RO systems to monitor the incoming TDS value and the outgoing TDS value.

Here is a diagram of my system.  You can see it has a few branches and valves to cut each section off.

System Performance
Right after installation, the manual recommends running a decent amount of water through the system to clear out any loose particulates in the filters.
Here is a graph showing the cycles of water after installation.  I basically let the system do it’s job filling the holding tank and drained it each hour and took readings.  After about 6 tanks (19 gallons) worth of water, I was down to 12 ppm!
I haven’t taken regular measurements, but here is a chart of the in/out over time since installation.  When I first bought the system, I was accepting that I would be replacing filter sets every year.  After seeing the measured performance of the system, I would say that after 2 years, there does not seem to be a noticeable difference in output, so I would consider the filters still operating properly.
Maintenance

Another question that will come up during ownership or in the research phase is how often to replace filters.  Several manufacturers seem to all state the same service interval based on time and not volume of water processed.

  • Stage 1 – Sediment filter, recommended change 6 months.
  • Stage 2 and 3 – Carbon filters, recommended change 6 months.
  • Stage 4- Membrane, recommended change 2-5 years.
  • Stage 5- Carbon in-line filter, recommended change 6 – 12 months.

Various sites, including this one (WaterFiltersOnline), indicate to replace the RO membrane when rejection falls below 80%.  That link also has a calculator for those that prefer not to math.

The rejection formula is:

Since I care about the overall PPM and not necessarily the rejection rate, I’ll probably replace all of the filters when I see a PPM close to 20. Using my average inlet PPM of 350 as a guideline, that would put me around 94% rejection. I’d consider that really early for normal recommendations, but since I’m going on 2 years with the original set of filters, I can stomach ~$50 for a new set of filters every few years.

Below is my installation plot, but with a trace for rejection added.

You can see the ramp up of the rejection rate as particulate in the new filters gets expelled from the system and the filters start doing their job. I did not show a chart of my long-term rejection rate, since it has been at 97% +/- 2% since I’ve been tracking it.

Conclusion

I am extremely happy with the RO system as I have installed it.  I’ve switched to drinking RO water exclusively around the house.  I’d like to say that this has been able to shift my palette slightly in that I should be able to pick out more subtle differences in my beer.  That could just be in my head however.  The TDS readings over time have shown the system to be working as intended and I’m quite happy with the filter performance over the 2 years I’ve had it installed.
Other benefits
We now have RO in the kitchen, which besides clean tasting water, we use it exclusively for coffee and our electric tea kettle.  The added benefit is that we now do not have to deal with mineral and lime build up on the heating elements.
Also, my oldest daughter has been raising a Cape Sundew and a Venus Fly Trap on our kitchen windowsill, which are both carnivorous plants and they require RO water.  Ever since I’ve installed the system, these plants have flourshed.  These plants have also allowed us to make it through an entire summers with out any fruit fly break outs!
Of course while working in the garage, I now also get to have a fresh ice water composed of RO ice cubes and RO water.


Water, huh! What is it good for?

Water, huh!  What is it good for?

Difficulty: level_1

Time Required:

As long as it takes you to read this post.

Affiliate Links

Water:

Back in November, I had the opportunity to see John Palmer give a seminar on water at Great Fermentations.  He was essentially on tour to promote his new book he co-authored with Colin Kaminski simply called, Water.  So the day I went to the seminar, there were tornado warnings.  As I write this, all water outside is in the form of ice.  Hopefully we’re at the tail end of the “Polar Vortex”.  A theme of things spinning, kind of like your head when you learn about water.

This isn’t a review of the book, or an in depth look at the chemistry of water, but just some of my musings on the importance of water in brewing.  Water has to be one of the most intimidating, mysterious, confusing and scientific parts of brewing.  To the beginning brewer, learning about it could confuse them enough that they think they’ll never brew good beer.

As you would imagine, at the start of his presentation I was completely engaged in what he was saying.  He had some entertaining slides correlating Lego superheros to certain elements of water.  I was understanding what he was throwing down.  I saw some charts and graphs that I understood, as any self-respecting engineer should.  Then we got to the chemistry balancing equations.  That’s when my eyes start to gloss over.  I’m reminded of the time in college when my wife (then girlfriend) said to me”your math is hard, it has letters”.  She was with me at the seminar and was following for a while and then got lost.  I never really enjoyed chemical formulas and electron counting and balancing equations.

So is understanding water necessary?  Yes!
Is being a amateur chemist a requirement?  No!
Is there an in-between that will get me producing good beer with minimal knowledge?  Yes!

First order of business is to simplify the intimidation out of the whole water thing.

In my opinion, this should be your priority level as you progress.

Starting out (Extract recipes):

Just go with tap water or water from the grocery store (see note at the end of this section).  I always went with Ice Mountain spring water, simply because I could actually taste a difference in waters and I liked it the best.  During this stage, I was always on the hunt for the water to go on sale.  For some reason, the online ads for my local grocery stores would not mention when it was on sale, nor were the sales on water the same at each location.  My benchmark price was $1/gallon, so if I saw it for that price, I was essentially clearing the shelves like some mad extreme couponer.  When I was really lucky, I would find the 2.5 gallon containers on sale and reduce the amount of plastic I was discarding each brew session.  I’ve never used just straight tap water, but I’ve tasted beers from people who’ve made beer with unadulterated city tap water and never had any complaints.  DO NOT however use softened water.

At this stage, don’t worry about treating the water.  Just brew and try to work on all of your other techniques.

*Recent reading/listening I have been doing indicates that with extract brewing, you might actually be better off with reverse osmosis (RO) or distilled water.  The theory is that the maltster making the extract has already created the proper water profile.  When the extract is concentrated, the water goes away, but the minerals are still there, so when you are adding it to your water, you are then getting those minerals in your brewing water.  This is backed up in a recent BeerSmith podcast with Colin Kaminsky and John Palmer.

Beer Brewing Water with John Palmer and Colin Kaminski – BeerSmith Podcast #70

Intermediate (Extract with steeping grains or all-grain):

This is where you want, at minimum, some sort of pH adjustment.  I use and recommend food-grade phosphoric acid.  Your LHBS should have it available, typically in 75-85% strength (ie 75% acid, 25% water).  I get it in a 4 fl.oz. container, which at an average of approximately 1 tsp per 5 gallon batch, it is good for about 24 batches.  FYI, I’m still learning and tuning my adjustments.  The much maligned colorpfast strips should suit you just fine at this stage.  Unless you just want to spring for the electronic pH meter.  As much as I love the gadgets, I opted for the strips first and have only recently purchased a pH meter.

Some details that emerged as I got more into water adjustments:

  1. Yes the colorphast strips are off by some amount (reports up to 0.3 pH) and the judging of color feels like you are being subjective, but they served me well and in my experience are very close to the digital pH meter.
  2. The most accepted method is to measure the pH of the mash about 20 minutes after dough-in, but remarkably, the amount of acid I was adding was within some small percentage of what I was adding when I was (incorrectly) measuring pH with the room temp water before heating up to strike temp.  Oh, well. Dumb luck, considering I now know that your malt bill works in conjunction with the water chemistry to alter pH.
  3. I am currently into evaluating different water chemistry spreadsheets to see which ones are most accurate at prediction.  Some of them say if you don’t know the pH of your water, just assume a pH of 8.  I got a fancy electronic pH meter to tell me that my water was 7.95.
  4. Oh, get a small sample of the mash water and cool it down before you measure the mash pH.  Unless you are using the strips, which in my usage, seem unaffected by temperature.

Advanced:

This is where you will be making changes that only people beyond your friends and family will notice the difference.  I’m talking about beer judges and those with the refined tastes.  I once heard Gordon Strong say on a podcast about water that water chemistry is the difference between a 30 and a 40 in competitions.  I do not feel I am at this stage yet, but what I keep telling myself is that pH adjustment alone is 75% of what matters in water adjustment.  In another podcast Jamil Zainasheff made a comment that after all of his work in understanding water, he was unsure which component of water adjustment was the most effective and wondered if it was mostly the pH adjustment.  If you do get to this stage, salts and other water additions are necessary to eek the last bit of perfection out of your recipes and really highlight your ingredients.

Conclusion:

To paraphrase something John Palmer said at the water seminar: Just like how salt, pepper and other spices really bring out the flavor in foods, the same can be said about the additions and adjustments to brewing water.

I am currently experimenting with the various software spreadsheets available to add the theoretical adjustment ingredients and be done with it.  I’m hopeful this is doable and I will be checking back in with this theory at some point.  Of course you still want to measure again to make sure your additions had the intended effect, but it would be nice to have a predictable method.  In the BeerSmith podcast referenced above, Colin Kaminski even notes that he has it down well enough that he’ll make the adjustments to the water before hand and knows what to expect.  If it doesn’t turn out like he preferred, he brews again and essentially renames the alternate batch as a different beer.

I’ll go over water reports, filtering, measuring and adjusting water and review various software tools used to predict adjustments in future posts.

006-Water - Me and John