Category Archives: Level 2

Level 2 difficulty

Beersmith3 BJCP Water Profiles

If water additions are somewhat of an enigma for you or you just don’t like to have to think (like me), I’ve worked out a method to quickly add recommended water profiles for most every BJCP style.  If you’ve been using Beersmith as your brewing software since version 2, you’ve probably been aware of the water profile tools.  Beersmith3 has made a big upgrade in that you can specify your target water profile and the salt additions will be calculated automatically.

Difficulty: level_2

Due to messing around with software files and probably some confidence if you haven’t edited files before.

Time Required

About 15 minutes, including the software download.
Affiliate Links

Background

Since the city water profiles are not what one should target when creating their brewing water, and the novice water chemist might be unsure if their lager should follow a yellow full or amber balanced, I’m pulling some resources together to take some of the guesswork and thinking out of it.  Did I mention, I don’t like to have to think?

One of the great features of Beersmith is that most of the files containing data are BSMX files, which are modifications/evolutions of Beer XML files.  What is great about this, is that files can be edited in a standard text editor.

http://www.beerxml.com/

In this post, I’ll show you how to quickly add them through a text editor, rather than adding them manually.  At the end of this small project, you’ll have added water profiles corresponding to most every BJCP style to Beersmith.

2018-OCT-23 UPDATE:  In the initial post, I had generated water profiles based off of one of my sources that was itself based on the 2008 styles.  I’ve gone through and done my best to match up appropriate water profiles for the additional styles in the 2015 BJCP guidelines.  I now have available a 2008 file and a 2015 file.

To avoid confusion in BJCP updates, I’ve added the year of the style to the names.  This will be especially important for users that want to access both the 2008 and 2015 styles at the same time.

As an example of the title changes:

03B. Oktoberfest Lager (2008) – Acidify: Maybe

would now read

06A. Marzen (2015) – Acidify: Maybe

Here are some good resources to understand the BJCP styles.

This would be your first stop

BJCP Style Guidelines

Then review this document to understand the differences from 2008 to 2015.  I hear there are some more small changes coming in 2019…

2008 Categories vs 2015 Categories

What I will not be covering in this post is a discussion or comparison of accuracy between water calculators.  Currently on various online social platforms and forums, there are spirited debates on the merits of each water addition calculator, especially the mash pH estimation tools.

I also have to give my opinion/recommendation on water here.  If you are relying on a water report you got for your home or using a city water report, I would strongly urge you to stop or at least allow for wide variation.  A neighbor down the street works for the Indianapolis water department and he was telling me that they are constantly changing water sources due to different variables.  Sometimes, multiple changes in a day.

That cemented my decision to just purchase an RO system (See the post on RO System Installation here) and not mess with water reports ever again.  Unless you are measuring your water profile with each batch or you have an extremely consistent water source, I would recommend going RO or purchasing DI or RO water from a store.

I also have to give mega credit to my two sources for the values used in my file.

Importance of Brewing Water

One of the most concise and understandable water articles I’ve ever read was an article written by Thean Leonard Kruger (aka KRUGER_BREWER) on homebrewtalk.

https://www.homebrewtalk.com/importance-brewing-water.html

This article was the inspiration and source of my values for my water profiles.

THE Water book

I also used and would consider a must-own is the book WATER: A Comprehensive Guide for Brewers by John Palmer & Colin Kaminski.  (Brewers Publications).  I’ll reference information from the 1st edition in this post.

All I’ve done is work out how to edit the Beersmith water.bsmx file to accept values without manually entering them one by one.

If you enjoy this post, please consider supporting this site by clicking on and purchasing products through the affiliate links in this post and on this website.

Cost

Free software and your time

Tools/Materials Required

Any text editor will work
Notepad is one that is already packaged with Windows and is about as basic as you can get.
My favorite however is Notepad++

I’ve found it to be one of the best text editors out there and sometimes it is even better to write code in Notepad++ than the original software’s editor.  Best of all, it’s free.

https://notepad-plus-plus.org/

Follow their instructions for installation.

Text File for Insertion

Also needed will be my text file to insert into your existing water.bsmx file.  Further down in the post.

Basics: How to change or create water profiles in Beersmith3

Unfortunately, Beersmith currently doesn’t have an easily accessible water profile tool like the mash, equipment and ingredient profile editors, so you have to go through an actual recipe to get there.  Keep in mind that once you select a profile, it will change your water profile too, so I suggest using a dummy recipe to do your water editing.

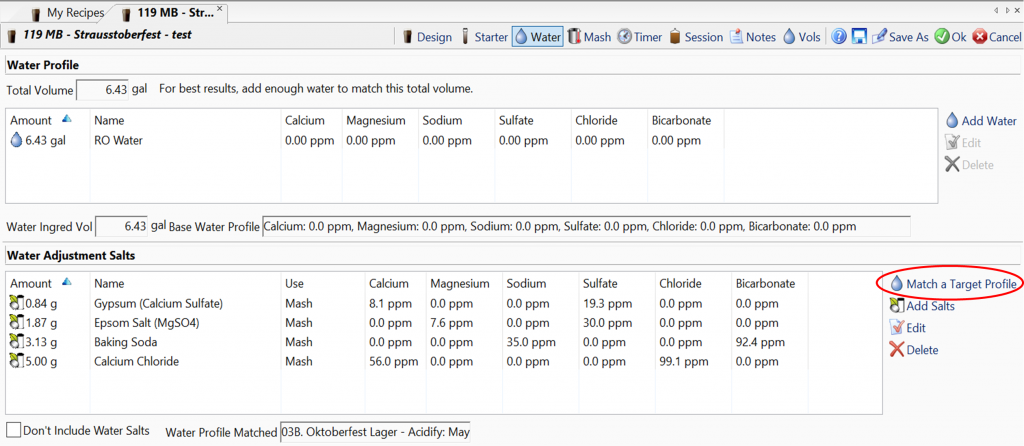
From your recipe, go to the water tab and click on “Match a Target Profile”.

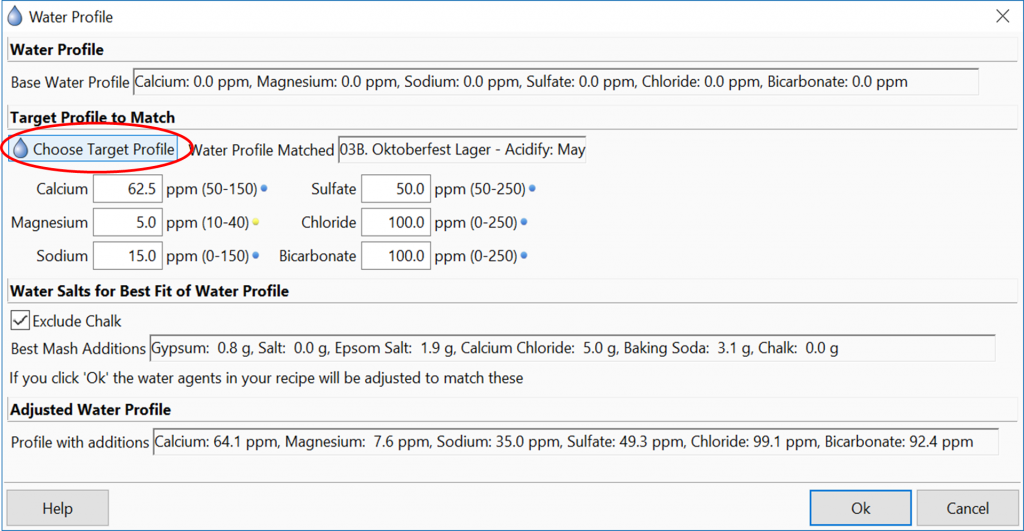
Click on “Choose Target Profile”

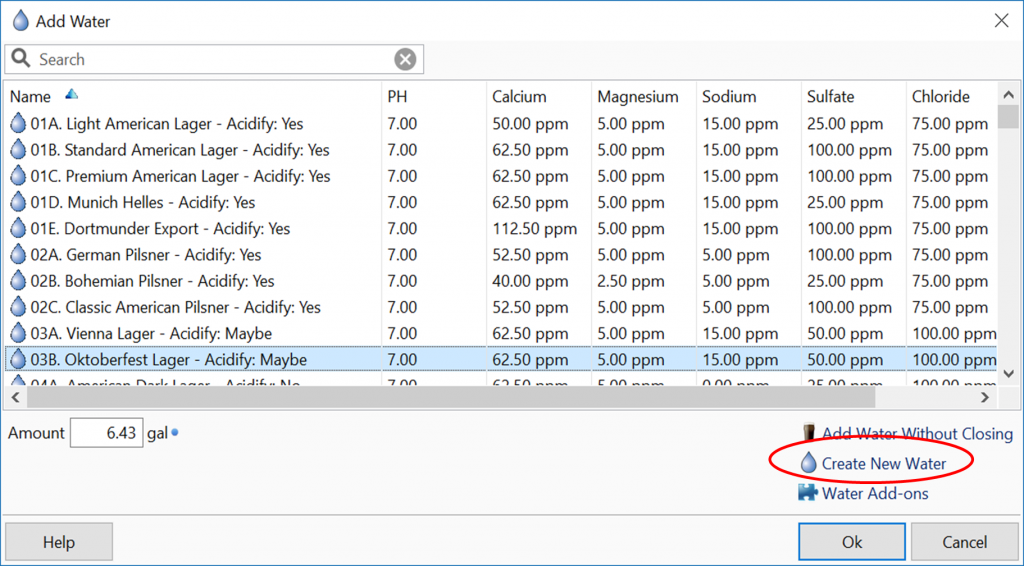
Then click on “Create New Water”

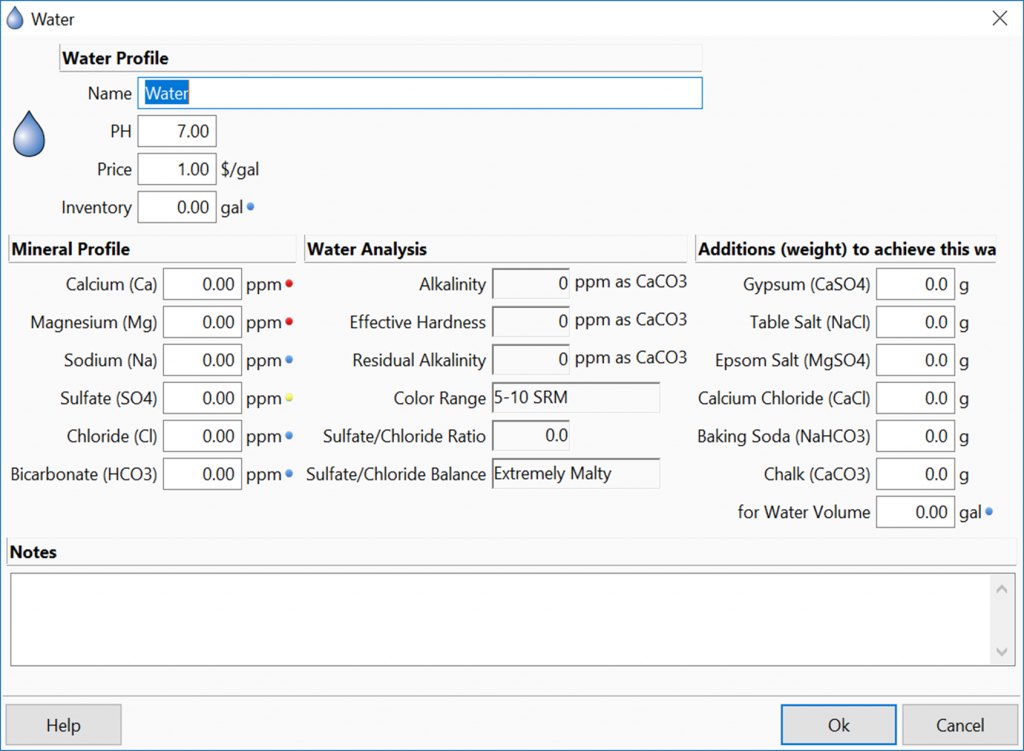
Now set whatever targets you want, a name, price and inventory if you choose to use those features.

That’s it!

What’s Included in the Download here

In the book Water on pages 156-159, Palmer and Kaminski lay out the water profiles for different categories of beers, but it sill requires the reader to think.  The mineral addition columns don’t spell out the targets in the format typically used by most every single water calculator out there.  Also, the BJCP styles are listed, but again, requires the user to go back and reference this chart when they go to brew a new style of beer.

Kruger’s article on homebrewtalk made an excellent start with extracting and listing maximum and minimum ranges for each mineral value and tying them to a specific BJCP beer style.  He also ordered them in the exact format that the water calculators use.  I’m assuming that each addition doesn’t necessarily have a linear relationship, but what I did was then take the averages of those max/min values to nail down one target number for the water profile.  Once you see the text file, be my guest to move your target values around.

Paraphrasing the data I’ve taken from Water are the notes on page 155 about acidity for each style.

Yes: acid additions are needed to hit target mash pH
Maybe: acid additions are generally not needed, but may be helpful
No: acid additions are generally not needed
If you want more detail, please buy the book.  It should be on your bookshelf anyway.
The way Beersmith handles the information in the file, the notes are pretty much only readable when you select the target water profile.  I did add the acidification recommendation to each profile title, that way the user has some tieback without having to reload the water profile.
Download file

I’ll start this off as a v1, since after I post this, there will inevitably be some errors or a water expert will weigh in and point to a better method.

2018-OCT-23 Updates: I’ve created a new file that contains my best estimations of appropriate water profiles for the 2015 BJCP guildelines.  Notes on my methodology are after the download button for the 2015 file.  I also somehow missed Russian Imperial Stout on the 2008 file, so that has updated as well.

2008

Did not include 20, 21 and 23, all of which should use the base style water profiles
20 Fruit Beer
21 Spice, Herb or Vegetable Beer
23 Specialty Beer

2015

Did not include 28-34, all of which should use the base style water profiles
28 America Wild Ale
29 Fruit Beer
30 Spiced Beer
31 Alternative Fermentables Beer
32 Smoked Beer *Except for 06B. Rauchbier
33 Wood Aged Beer
34 Specialty Beer

New Style source profile

03A. Czech Pale Lager: Used 03B. Czech Premium Pale Lager profile
03C. Czech Amber Lager: Used 07A. Vienna Lager
03D. Czech Dark Lager: Used 08A. Munich Dunkel
04B. Festbier: Used 04A. Munich Helles
05A. German Leichtbier: Used average of German Pils and Munich Helles
07C. Pale Kellerbier: Used 04A. Munich Helles
07C. Amber Kellerbier: Used 07A. Vienna Lager
10B. Dunkles Weissbier: Used 08A. Munich Dunkel
12A. British Golden Ale: Used 18B. American Pale Ale
12B. Australian Sparkling Ale: Used 18A. Blonde Ale
15C. Irish Extra Stout: Used 15B. Irish Stout
16C. Tropical Stout: Used 16A. Sweet Stout
17A. British Strong Ale: Used 17B. Old Ale
22B. American Strong Ale: Used 22C. American Barleywine
22D. Wheatwine: Used 22C. American Barleywine
26A. Trappist Single: Used 05D. German Pils
27A. Gose: Used minimums
27A. Kentucky Common: Used 09D. Irish Red
27A. Lichtenhainer: Used minimums
27A. London Brown Ale: Used 13B. British Brown Ale
27A. Piwo Grodziskie: Used minimums
27A. Pre-Prohibition Lager: Used 02A. German Pils
27A. Pre-Prohibition Porter: Used 13C. English Porter
27A. Sahti: Used minimums

First caution

Do remember, the downloadable file is a text file (.txt).  It is not a complete water.bsmx file.  The purpose of this post is to show the reader how to insert this pre-formatted data into their water.bsmx file.

**DISCLAIMER**

I am not responsible if you make a wrong step and somehow render your Beersmith installation useless.
Please make a backup of your water.bsmx file before editing it, better yet, make a backup of your entire Beersmith installation folder

How File is Constructed

Most readers familiar with programming or XML will be right at home here.  There isn’t anything to difficult to discern.  It’s pretty intuitive.

Header

This contains information that Beersmith reads when opening the file.

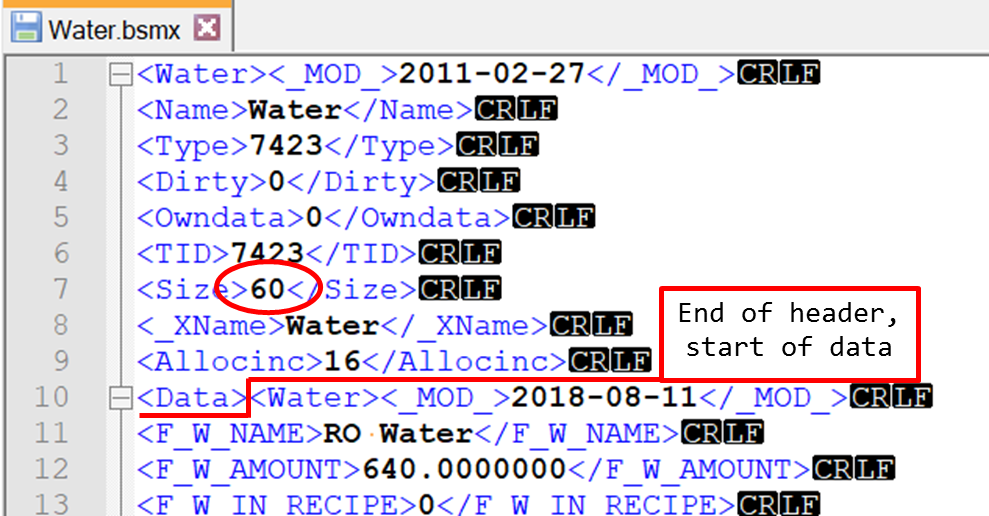
You can see in my example the <Size>60</Size> line.  This will be important to edit when you add my text file.  This tells the file how many entries to read.  If you get this wrong, Beersmith will either strip out one of the entries or I don’t know what else it could do.

This also shows the <Data> tag to start the entries.
The CR and LF rectangles are the symbols shown in Notepad++ to indicate end of lines.

Body / Individual Water Profiles

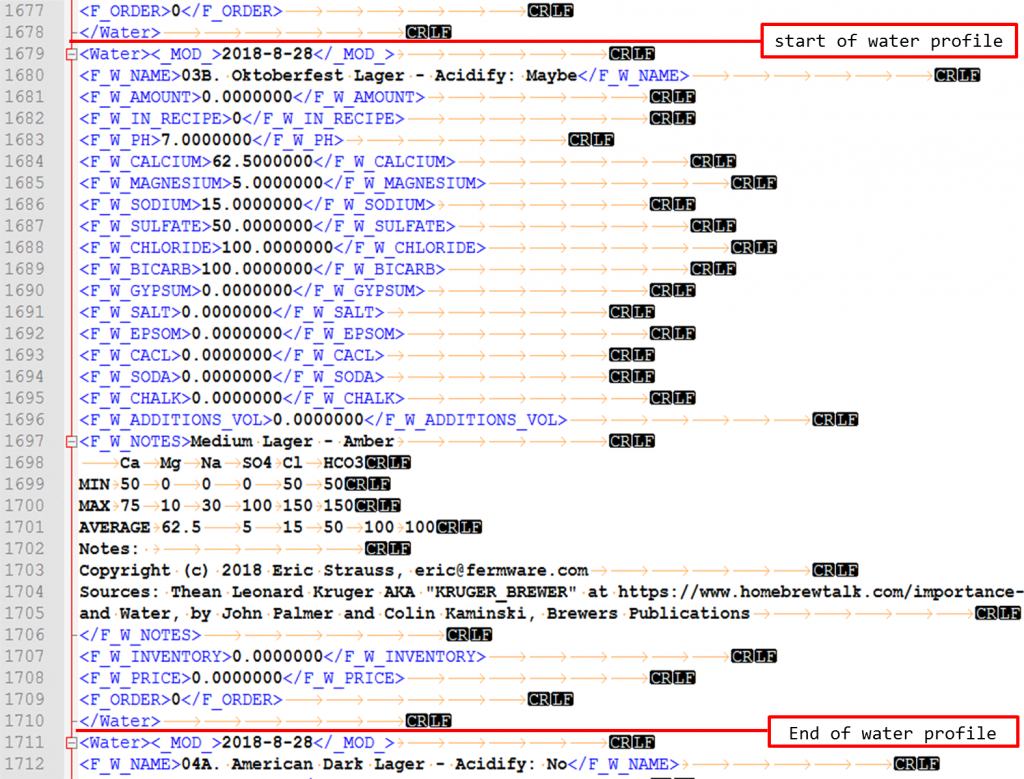
Each water profile begins with <Water> and ends with </Water>

I don’t know what tags are actually required, so I included all in my file.

You can see the CR and LF symbols again.  Also shown are orange arrows, which are the tab symbols.  It appears that Beersmith cleans the unnecessary ones up after opening, reading and saving the water file.

Footer

The footer is also only a few lines and helps to close out the file.

Make sure you don’t have any additional information after the closing data tag </Data>.

Water Profile File Modification (what you are here for!)

Here is the quick method for those that are confident in what they are doing
  1. After making a backup of your water.bsmx file
  2. Without Beersmith running
  3. Open the “water.bsmx” file
  4. Increase the <Size>some number</Size> value in the header by the number of new entries (add 73 for 2008, add 100 for 2015)
  5. Insert my new text data at the end of the last </Water> profile
  6. Save the file
  7. Open Beersmith and using a test recipe, check that all of the profiles have been loaded
Here is the longer detailed set of instructions
  1. After making a backup of your water.bsmx file
  2. Ensure Beersmith is not running
  3. Browse to and open your “water.bsmx” file with your text editor.
    1. Should be located in your Beersmith3 installation folder
  4. Tips for Notepad++
    1. to get easily readable formatted text, Language menu > XML
    2. When editing Input/Output files, I also turn on the View > Show Symbol > Show All Characters
      1. This way, I can see if there are any unintentional non-visible characters that could break the file
  5. Find the <Size>some number</Size> tags at the header of the file and increment them by the number of new entries.  With my version 1, that would be (add 73 for 2008, add 100 for 2015).
    1. Example: If it currently shows <Size>30</Size>, you should change it to <Size>103</Size>
    2. 30 + 73 = 103
  6. Now go to the bottom of the file to the last closing tag for water </Water>
    1. take note of this line number
  7. Insert my entire text file in this spot
  8. Double check the beginning line where you inserted the file and the end to ensure there are no empty lines
  9. Save the file
  10. Open Beersmith and using a test recipe, check that all of the profiles have been loaded
    1. Beersmith does seem to do some cleanup when it opens or closes the file and removes any unnecessary tab characters that were in the file to begin with.

Conclusion

Since I am not a water expert, I hope this helps other non-water experts.  So please don’t ask me any water chemistry questions, I’m just a messenger here.  If you are a water expert, I hope I’ve presented all factual or at least close enough information that will help brewers with this sometimes confusing and intimidating subject.  Regardless of what camp you are in, I would welcome feedback for future improvement.


Fermentation Controller Temperature Probe Placement

Once one has decided to install a temperature controller on their fermentation chamber, one of the first questions is where to place the temperature sensor. In this post, I’ll show the results of 3 identical beers fermented using 3 different configurations.

Nerd Alert!

Warning, the material in this post could get a bit nerdy.

WarningSign

Difficulty: level_2

If you have made it this far, please continue.

Time Required

Just the time to read this article and implement your chosen solution.

Affiliate Links

Background

A recurring question I see on various social platforms is “where do I place the temperature probe? I often see a variety of answers, with each person claiming to be right or saying it doesn’t matter. Typically the choices for probe placement are:

  • Thermowell / directly in the fermenting beer
  • Taped or placed on the side of the fermenter
  • Placed in or on some sort of buffer (bottle of water, can of domestic beer, etc)
  • Hanging in the fermentation chamber

I have seen other tests where a temperature probe is just used to control the temperature of a mass of water. This is good information, but it only tells part of the story.

The reality of the situation is that while fermenting, from the fermenter’s reference frame, it is an exothermic reaction. What this means is that while fermentation is active, the direction of heat flow will be from the beer, through the fermenter wall, to the air in the chamber, then out of the chamber to atmospheric. This is of course assuming your fermentation chamber is placed inside or in a location that is warmer than the desired fermentation temperature. If your fermentation chamber is in a garage or location that will be colder than the desired fermentation temperature and any situation where you’ll be pushing your fermentation temperature above ambient, the direction of flow will be different. That will be discussed later in the post.

From basic controls theory, one should measure directly what one is trying to control. In this case, if you are trying to control the temperature of the fermenting beer, you should then measure the use the temperature of the fermenting beer as the input to your control system.

Interchangeable words in THIS post

probe = temperature sensor used to drive control algorithm
temperature probe = temperature sensor
fermenting beer = fermenting wort = beer = wort
fermenter = carboy = bucket = fermentation vessel
fermenter != fermentation chamber
fermentation chamber = refrigerator = keezer = kegerator

If you enjoy this post, please consider supporting this site by clicking on and purchasing products through the affiliate links in this post and on this website.

Cost / Tools / Materials Required

It depends on your decision after reading this article

Setup and Method

The Subject / Constant

Three different fermentation chambers were used, all of which used the exact same wort, with the exact same yeast. The recipe was an Oktoberfest with an OG of 1.054 and the yeast was a slurry of Wyeast 2206 from a previous batch. Each wort started with a temperature around 65 degF so that one could assess the performance of each control method in rapidly cooling wort. My target fermentation temperature of the beer was 52 degF and this was done in my garage in September in Indiana.

The Controller

The fermentation controller was based on the BrewPiLess, which is a derivative of the BrewPi controller. I like this setup, because it doesn’t require both a Raspberry Pi and an Arduino. All it requires for the controller (as of now) is a much less expensive ESP8266 / ESP-12E or a Wemos D1, plus the temperature sensors and whatever power relay you want to use. It can be used as a “dual-stage” controller, meaning that it will control a heating and cooling device for your fermentation chamber.


The standard BrewPiLess setup allows for 3 temperature sensors.  I have my controllers set up to use all 3.  The standard sensors would be:

  1. Beer Temp
  2. Chamber Temp / Fridge Temp
  3. Room Temp

I put the 3 sensors to best use to measure the fermentation chamber characteristics.  I also checked each set of sensors prior to installing in the fermentation chambers and each controller’s temperature sensors were within 0.5 degF.

With the BrewPi/BrewPiLess setup, there are a few different control options. You basically set your desired temperature and then determine what sensor in the setup will be used to maintain this temperature.

Beer constant

The fermentation chamber will be cycled so that the target temperature of the chamber will be driven by the sensor labeled “beer”.  This is the control method I used for all 3 configurations.

Fridge constant

The fermentation chamber will be cycled so that the target temperature of the chamber will be driven by the sensor labeled “chamber”.  I did not use this control method at all.  I would only recommend this method for a kegerator/keezer.

The Variables

Fermentation chambers

With all 3 fermenation chambers using the BrewPiLess controller and the same wort, I tried to minimize the variability of each setup. The biggest difference in all three setups is that identical fermentation chambers were not used, which in my opinion is a negligible factor. My opinion is founded by considering the speed with which the fermentation chamber may adjust it’s temperature with respect to the rate of change in temperature of the fermenting wort. The fermentation chambers / refrigerators, can change temperature rapidly and effectively with respect to the rate of change of the fermenting beer.

Control Methods

The great thing about the BrewPiLess setup, is that you can log data locally, or in my case, log the temperature data to a cloud based service. In my setup, I logged to Thingspeak.com. I logged every minute during the test, which was required to pick up on temperature changes and responses during each power cycle of the refrigerator. For normal fermentations, I log every 10 minutes.  This data would then be used to compare target temperatures to the actual temperature of the fermenting beer. The table below summarizes the various control methods and probe placement that were used in the three fermentation chambers.

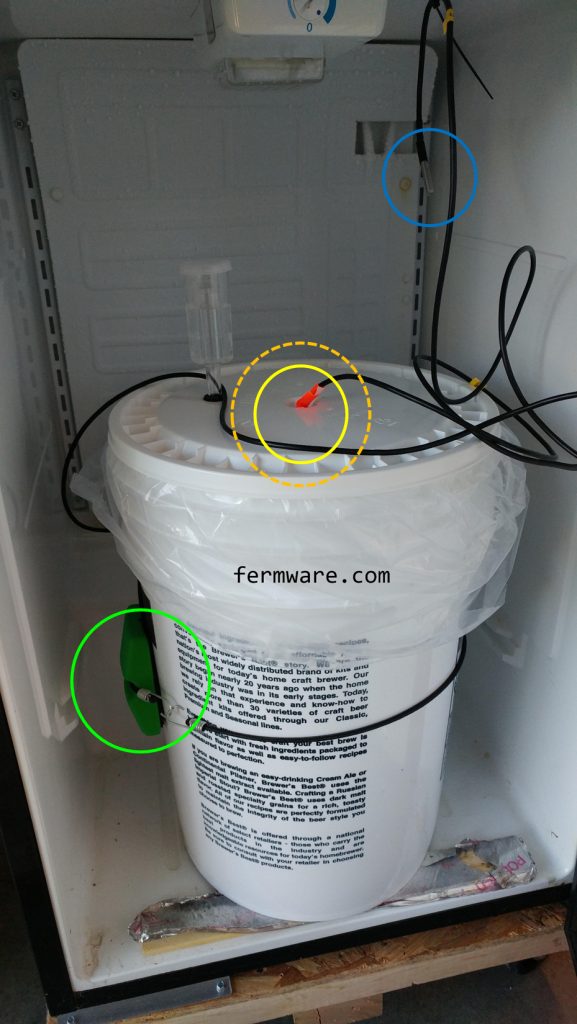
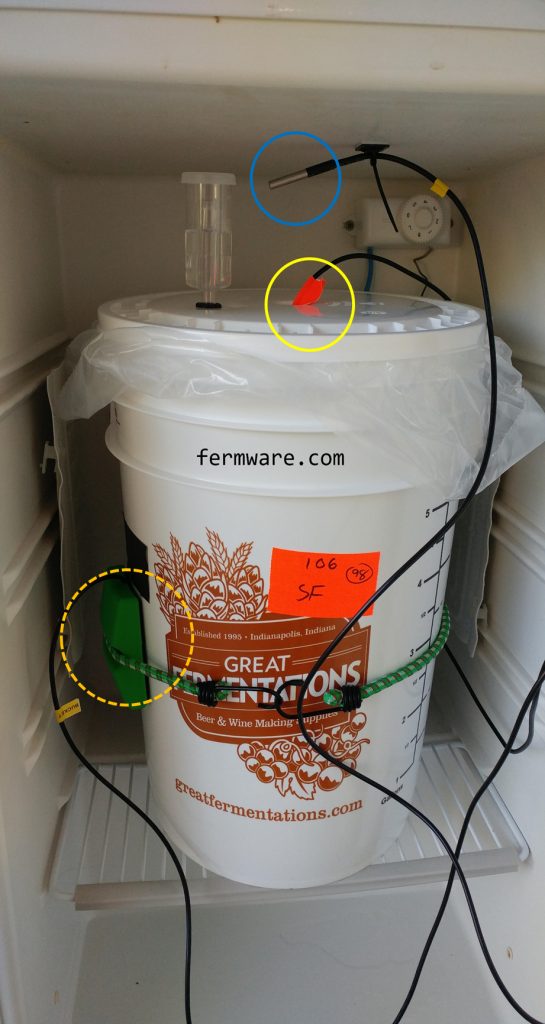
I’ve tried to color code the pictures of the setups similar to the results charts shown later.

Yellow = Beer temperature probe

Blue = Fermentation chamber temperature

Orange Dotted = Control temperature probe

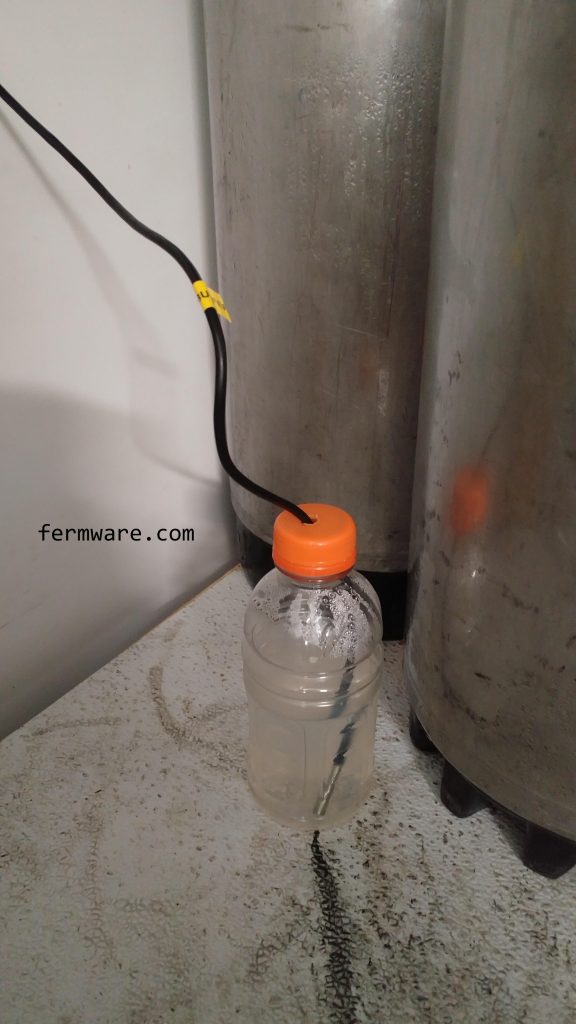
Probe in Buffer (Fridge Constant)

This setup is what we call at our house, the “Lagering Fridge”.  The construction was highlighted in my series of posts Refrigerator Conversion to Kegerator

Below is a picture of the temperature probe in a buffer.  It’s simply a small volume of fluid that will serve to dampen or “buffer” the temperature swings.

Probe in Beer (Beer Constant)

This is the theoretical best method as the temperature controller is controlling to the actual beer temp.  This is in a converted dorm fridge I use as a lagering chamber.  I placed the temperature probe midway back in the fridge so that it’s between the cooling element and the door.


Here is a top view diagram of where the sensors were positioned in the last 2 configurations.

Probe on Bucket (Beer Constant)

This is basically the same setup as Probe in Beer, but in a different fridge (same size fridge) and obviously a different control method.  This method in use is the easiest in terms of not having to do much extra to set up, since you are simply placing the temperature probe on the outside of the fermenter.

Results

Fortunately, each of the three methods provided distinctly different responses, which enabled me to show that there are differences in how accurately each method controls the temperature of a fermenting beer. I’ll start with what I would consider the poorest control method. I would like to point out that once I started the diacytl (temperature ramp up)rest period, all of the methods showed a larger negative (-4 to -7 degF) delta due to the fact that there was not a forced warm up of the wort, but rather a passive warm up due to internal fermentation heat and ambient heat outside of the fermentation chamber.

Probe in Buffer (Fridge Constant)

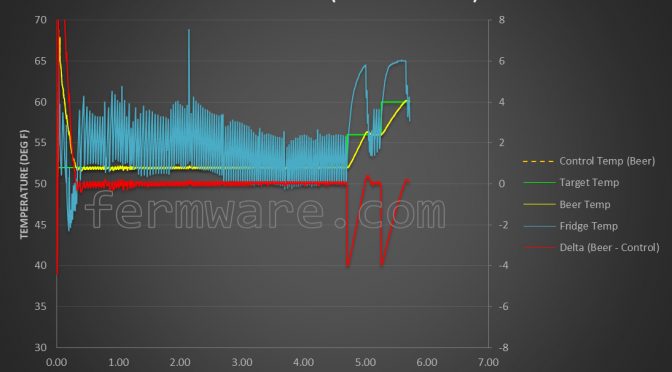
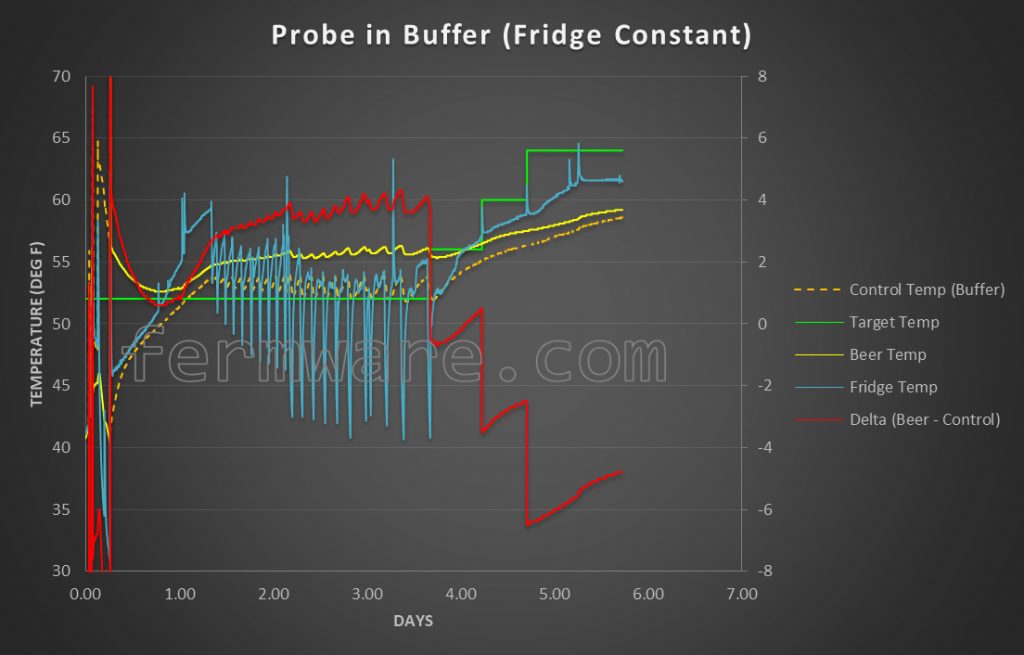
Using this method, the fridge and beer temp are measured in addition to the control temp, which was the buffer. You can see in the chart a bit of wonkyness at the beginning, where in my attempt to be clever, I mislabeled the sensors and had them in the wrong locations. I fixed it within a few hours and it did not affect my interpretation of the final results.

During the chilling phase, this method shows that it takes nearly 15 hours for the wort to chill from 65 degF to below 53 degF. This would be explained by the fact that the buffer was less than 16 oz of starsan water versus 5 gallons of wort and it reached the setpoint temperature much sooner than the the uncontrolled fermentation bucket would.

Once the wort had chilled down to temperature, this method still showed having trouble keeping the fermenting beer at the target temperature. The fermenting beer was about 3-4 degF warmer than the setpoint through the intitial portion of fermentation.

Probe in Beer (Beer Constant)

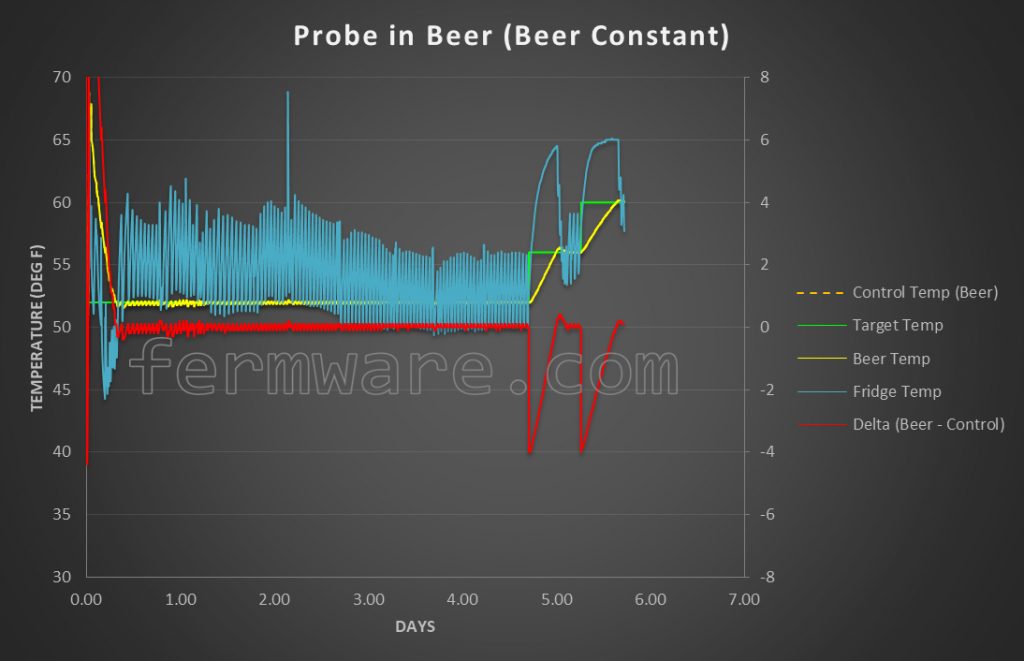
For the chill down phase, it took 6.8 hours for the wort temp to go from 65 degF to below 53 degF using this control method. Barely slower than the probe on bucket method, so we could potentially call this within capability of the refrigerator. I could do the math on the amount of energy or heat pulled from the air inside the fridge, but I’m not going to nerd out that much.

For the remainder of the initial fermentation period, the temperature of the beer was dead on target. From looking at the data, the moving peak-to-peak temperature swing of the refrigerator was much larger using this control method than the probe on bucket control method.

Probe on Bucket (Beer Constant)

The overall result here is not what I would have expected. I would have assumed that the actual fermenting beer temperature would have been warmer than the target temperature (controlled by the outside of the fermenter), but what the data showed is that it was the complete opposite, however small (within 1 degF).

It did take 6.5 hours for the wort temp to go from 65 degF to below 53 degF using this control method. At first the temperature controller overshot and took the wort to 2 degF below the setpoint, then seemed to settle in around 1 degF or less lower than the setpoint for the remainder of the initial fermentation period.

Discussion

Having looked at the actual data, here are my opinions on the pros/cons of each method

Probe in Buffer (Fridge Constant)

Pros: nothing to attach to your fermentation vessel
Cons: least accurate method

Probe in Beer (Beer Constant)

Pros: most accurate method
Cons: highest risk of infection of the 3 methods

Probe on Bucket (Beer Constant)

Pros: not much extra equipment/setup for this method and less risk for infection
Cons: middle of the road on accuracy

Astute readers will notice that in the Probe in Beer and Probe on Bucket configurations, the Fridge Temperature was above that of the beer.  This does not make sense, right?  One has to understand that the “Fridge” temp sensor was only reporting what that sensor was reading and not necessarily the actual temperature of the fridge.  It’s entirely possible that at the top of the fridge where the sensor was mounted, it could have been warmer than the rest of the fridge, presumably due to heat ingress to the refrigeration chamber.

I’m not about to launch another blog post about fermentation chamber thermodynamics.  I could, but I don’t think it will serve a majority of the homebrew community.

Fermentation target above ambient

If you are in the case where you need to raise the temperature of the fermentation above ambient, I would propose that the method of attaching the probe to the outside of the fermenter would probably still be sufficient. However, you should be careful to insulate the temperature probe from the heat source. If you are using a heat wrap, definitely don’t place the probe right on the heat wrap, as the controller will most likely cycle on and off fairly often and either fail prematurely or not get to the desired fermentation temperature.

If you decide that attaching a temperature probe to the side of your fermenter is impractical, I recommend placing the probe in a location that will not be in the direct path of the cold air from a fan, cooling source or right next to the door.

If you decide that attaching the probe to the outside of the fermenter is ideal, I would recommend placing the probe midway up the fermenter so as to be in the middle of the liquid level. As in the above recommendation, I would place the probe on the fermenter midway between the door of the chamber and the cooling source. That way you at least are splitting the difference between the warmest and coolest regions of your chamber. If you have a circulation fan, I would also recommend placing the temperature probe out of the airflow.

Finally above all else, I would try to place some sort of insulation on the outside of the probe, so that the probe is receiving most of it’s measurement from the heat exiting the fermenter walls. Suggested ideas in varying levels of effectiveness would be a towel, bubble wrap, actual insulation, tape, etc.

If your chosen approach is a thermowell or placing the probe directly in the fermenting beer, there are many options out there. I would just be sure to make sure you have a good seal where the probe cable enters the fermenter. If not, you’ll have a nice place for unwanted bugs to make their way in.

Conclusion

As shown, the most accurate method is to place the temperature probe in the fermenting beer. However it is up to the reader to determine what suits them better.

I personally have taken the stance that putting a probe into the fermenting beer is one more possible source of infection and yet another thing that I have to clean. I will accept the few degrees difference between target and actual and make judgement calls with each batch on how aggressive I want to be on the over/under on my setpoint from target.

I also take the approach that if your target was 50 degF and your fermenting beer remains at 48 or 52 degF, I do not think the end product will be affected enough to make any realistic difference.


Reflectix Insulation Jacket for your Mash Tun

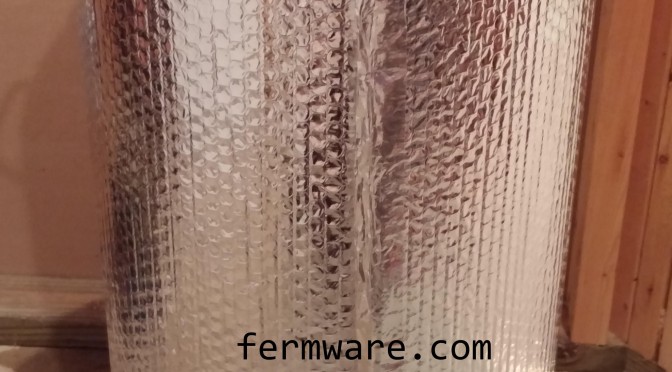
Do you want to make your mash tun or electric kettle look like it’s been prepped by SpaceX and give it some good thermal characteristics?  Read on…
Sorry if I offended both SpaceX or NASA employees in one statement.

Difficulty: level_5

This is pretty easy.  It just requires some simple measuring, cutting and taping.  The patience portion of this may not be so easy depending on how good you are at measuring, measuring, calculating, measuring, measuring, marking, checking, measuring and cutting.

Time Required:

maybe an hour at the most.  Depending on how meticulous you are and how many do-dads are sticking out of your mash tun.
Affiliate Links

Background:

In my last post, Mash Tun Insulation Comparisons I ran an experiment on various forms of insulation for your mash tun.  My platform was the new Brewer’s Edge Mash & Boil.  Even though the jacket was made specifically for the Mash & Boil, I’m also going to lay out how to measure out your Reflectix insulation jacket.

Cost:

$15-$30

Tools/Materials Required:

  • Reflectix
    • I purchased a 24 inch wide x 25 foot long roll for mine.  It is about enough for 6 layers , plus lids on a 12 inch diameter mash tun.  I’m only making 3 layers here.

  • Reflectix tape
    • Any other HVAC metallic tape will serve the same purpose
    • I just chose the Reflectix brand, because it didn’t have any writing on it.

  • High temp hook and loop
    • The normal Velcro brand adhesive only listed something up to 140 degF.  Since I was going to possibly be boiling with mine on, I wanted to find something rated higher.  This brand (although pricey for what you get) is rated up to 212 degF (100 degC)
  • Utility knife, get a fresh blade.
    • Believe it or not, the Reflectix dulled a blade from cutting 2 jacket’s worth
  • Long straight edge (great cutting guide) or tape measure

Method /How it’s made:

Here are the basic principles of measuring out a jacket for your mash tun.
  1. Choose a reference start location for your measurements, both in height and distance around the kettle
    1. You’ll want to choose something that you will want to stop and start at (spigot, sight glass, etc)
    2. I chose the spigot for the perimeter and the top lip for the height
  2. Try to sketch out what the jacket will look like rolled out with windows for all of the obstacles (look at my provided template)
  3. Remember, it’s easier to remove material than add, so as they alway say, “Measure twice, cut once!”
  4. When adding an additional layer, remember that the cutout locations will move further from your reference at each layer, due to the additional diameter added with each layer.
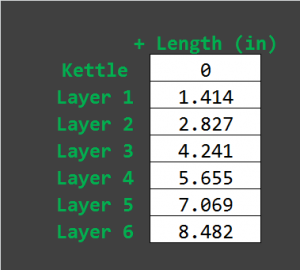
    1. For the Reflectix, it averages out at about 0.225 inches thick, so here is quick table that shows the amount of additional length to add for each layer length to just make it around.  If you want to add a tab for velcro, I’d use about 2 additional inches as I did.
    2. The formula for this addition is: 2*Pi*0.225*(layer number)
  5. 025-Layer Offset Chart
  6. Then for each cutout, it will be a ratio of the table above, depending on how far around the circumference it it.
  7. In all reality, you might outsmart yourself with the math, so there is no shame in just doing it all by hand.  Just go one layer at a time, then tape it all together when you are done.
  8. For the lids, I just set the lid on top of the Reflectix and traced around it with the utility knife.  Then I just cut a little tab to go through the handle on the top.
  9. When you are done,  you can simply tape all of the ends together to make it nice and neat.  I chose to just tape the very ends, since on the curve the stiff aluminum tape was going to look pretty wrinkly

Completed Jacket:

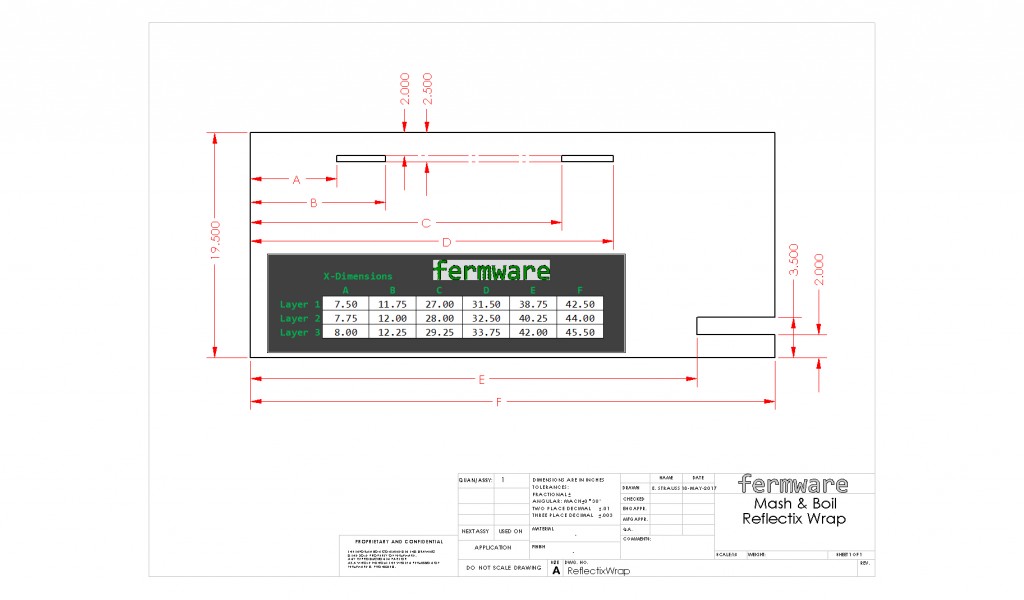
Here is the dimension scheme for a 3 layer Reflectix jacket for the Brewer’s Edge Mash & Boil.  Mine sits just on top of the display panel and just under the top lip.  I also rounded dimensions to the nearest 1/4 inch to make measuring and cutting easy.
025-Reflectix Insulation Jacket
The hook and loop was pretty straightforward
025-Velcro
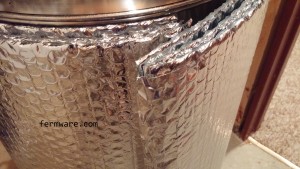
I didn’t want to mess with finishing all of the edges, so I just picked key areas.  I can always go back and add it if necessary.
025-Finished Edge
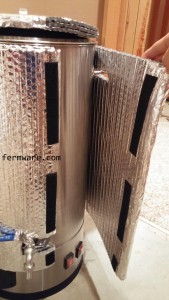
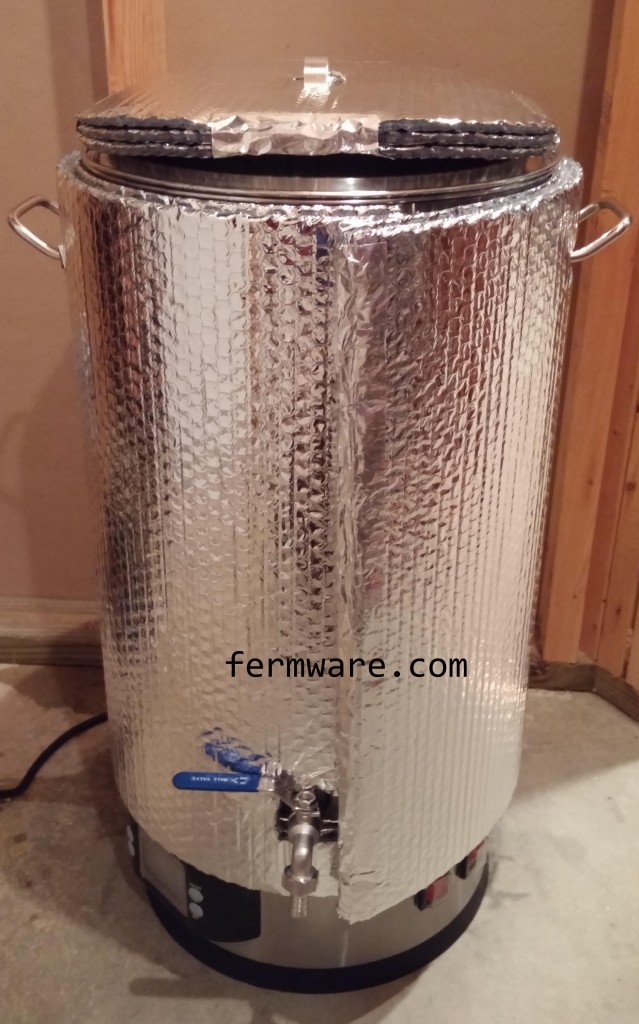
And here is the completed Reflectix jacket
025-Completed Jacket