All posts by Eric

Mein Bierwagen Part 2 – Building the Frame

This post will present the basic plans to construct the wooden frame of the Bierwagen.

Difficulty: level_3

This project just requires some basic building skills, but you might need some help getting the keezer onto the Bierwagen.

Posts for this Project:

Part 1: Introduction
Part 2: Building of the frame (this post)
Part 3: Bicycle wheel attachment
Part 4: Getting the keezer onto the Bierwagen
Part 5: Keezer collar
Part 6: Storage of the Bierwagen

Affiliate Links

Helpful Tools:

Circular Saw or Miter Saw
Drill or Impact Drill

Materials Needed:

  • (qty 6) 2×4 x 96″ boards
  • drywall/deck screws (2.5″ is perfect for most of the joints where you have two 2×4’s side-by-side (3″ total thickness at that point)

Overview:

Here are a few views of the cart (without support legs attached) for reference.

015-2 - Front 3_4 View

015-2 - Rear 3_4 view

This is the cart flipped over so you can see the attachments for the wheels.  The fabrication of those will be in a subsequent post.

015-2 - Back View

Construction:

I’m not going to do a step by step, since the pictures and following information should be sufficient for most readers taking on this task.

Design:

Below is the top view of the cart with only the major dimensions shown.  I had several constraints when designing the cart.  As I mentioned in the first post, it will be rolled out for a grand unveiling at our party.  It had a few obstacles to navigate during it’s trip from the garage to the back yard.

  • It must fit through our gate
  • It must be able to navigate large bumps (edge of driveway and protruding tree roots in the grass)
  • Quick disassembly and assembly for storage under our deck during the other 364 days of the year
  • Utilize our bike tires
  • Integrated ramp system for easy loading/unloading of my keezer dolly
  • It needed to be sturdy enough to stand on that I could switch over kegs during the party
  • The weight of the keezer must be carefully balanced so that the Bierwagen does not tip when set to rest, yet far enough back that lifting from the front is easy.

You can see the profile of the keezer dolly on the top view to show that it is sufficiently in front of the axle line to prevent tipping.  You’ll see in the loading/unloading post how it slides up the “ramp” to be set in place.  I added an extra 1/4″ clearance to the outer edges of the casters so that they would not rub on the frame rails when moving.  I also had to add about 4″ of clearance for the bike wheels.  The Bierwagen is probably overbuilt and pretty heavy to lift, but it serves it’s purpose that one day of the year where it counts!

015-2 - Top_View

The side view shows all of the other major dimensions and locations of the boards.  Again, you can see how the center of the keezer dolly is between the bicycle wheel axles and the legs.  When changing kegs over during the party it is important to stand between the keezer and the legs.  This will also prevent tipping.  You’ll see on the post where the keezer is getting loaded onto the “ramp”, that the standard 3.5″ height of a 2×4 is just low enough to get my keezer dolly up onto, but if you need a little more clearance, you could put an optional cut into the end to get you what you need.

015-2 - Side_View

REMEMBER, IMPORTANT TO AVOID TIPPING!!!!!!:

  • MAKE SURE THE WEIGHT (CENTER OF GRAVITY, CENTER OF MASS, ETC) OF THE KEEZER IS BETWEEN THE WHEEL AXLE LINE AND THE FEET
  • MAKE SURE YOU STAND BETWEEN THE KEEZER AND THE LEGS WHEN MESSING AROUND INSIDE THE KEEZER OR WITH THE KEEZER

Cut list:

Below is the cut list if your Bierwagen ends up matching mine.  I was able to build my cart from a quantity of six, 2x4x96″ studs.  The color coding is consistent with the downloadable guide.

The legs and cross-member supports required mitered ends.  The lengths shown are for the full-length board that you will then trim the angles in the boards.

015-2 - Cut_List

Of course, your keezer is most likely a different size and you may not even have a keezer dolly, so take my plans and modify them to suit your needs.  The cut list is in an ideal world, so you may have to buy an extra 2×4 or if you are like me, you’ve always got some on hand for whatever needs may pop up.

Download the Detail Prints for Frame and Cut List by subscribing:

Creative Commons License
This work is licensed under a Creative Commons Attribution-NonCommercial-ShareAlike 3.0 Unported License.

By clicking on the download, you agree to the terms of this license and to be added to the awesome fermware.com subscriber list. Don’t worry, you won’t receive a bunch of trub in your inbox.

[purchase_link id=”2107″ style=”button” color=”green” text=”Download Mein Bierwagen Cut List”]

Up next…

Bicycle wheel attachment

Posts for this Project:

Part 1: Introduction
Part 2: Building of the frame (this post)
Part 3: Bicycle wheel attachment
Part 4: Getting the keezer onto the Bierwagen
Part 5: Keezer collar
Part 6: Storage of the Bierwagen


Managing Your Brewing Schedule

In order to brew good beer, you need good preparation.  You’ve probably heard a coach, parent or teacher tell you the 5 P’s.
Prior
Preparation
Prevents
Poor
Performance
Or some variation on that theme…
I’ll show you how I plan out my brewing to make best use of my time, equipment and yeast.

Difficulty: level_2

This just requires a quick read and downloading of the Excel file or creating your own.  What you do from here is up to you.  You’ll be able to download my file at the end of this post.

Affiliate Links

Background:

I really love Gantt charts and how they can help you to be organized. Microsoft Project is either a really good or really bad tool to use (depending on who you ask). I actually like it for projects that I manage at work, but I don’t get into the fine details. I just use it for basic timelines, since it really helps me see the big picture. I started looking at using it for my fermentation schedules, but in brewing, your yeast are on a 24/7 schedule and I was finding all sorts of roadblocks in using 24 hour schedules in Project.

WarningSign

I ultimately decided to go back to my old trusted Excel spreadsheets for this task. This format has served me well for the last two years. I don’t claim that this is the ultimate way to do it, but it might at least serve as inspiration for someone else to create something grander.

Hover or click on each section to learn how I use this sheet.

Sorry, image map is currently out of order.  Please use the descriptions below to see how each section is used.

[imagemap id=”1206″]

Conclusions:

Like I said, I hope that this helps a fellow brewer out for mapping out their schedule or inspires another to build on this or create their own.  Happy Brewing!!

Download the spreadsheet by subscribing:

Creative Commons License
This work is licensed under a Creative Commons Attribution-NonCommercial-ShareAlike 3.0 Unported License.

By clicking on the download, you agree to the terms of this license and to be added to the awesome fermware.com subscriber list. Don’t worry, you won’t receive a bunch of trub in your inbox.

[purchase_link id=”2090″ style=”button” color=”green” text=”Download link for fermware Brewing Schedule”]

All info below is a repeat for those whose browsers or mobile devices don’t like the image map format.

Beer Description and Basics:

014-Beer Descriptions and Basics

These columns simply denote the batch number, size, name and the yeast to use.  I just added yeast this year so I can manage my yeast more efficiently with re-use and/or racking onto yeast cakes.

Yeast Color Codes:

014-Yeast color codes

I heard on one of the brewing podcasts that you can actually go 8+ generations with really healthy yeast, but since I’m not in any kind of production capacity, I’m usually at the third generation before I’ve reached the end of my step ups.

Dates:

014-Dates

Since I typically brew on Saturdays, I just chose the Saturday date preceding the next week as my column headers.  I then highlight the weekends where we were either out of town, that weekend was off limits to brewing or maybe a weekend for a school break for the kids.

Very Top Row:

014-Top_Row

I didn’t enter any beers for NHC this year, but I did enter some in the Indiana Brewers Cup.  I had a week highlighted for the due date for entries and then the actual awards banquet.

Gantt Chart:

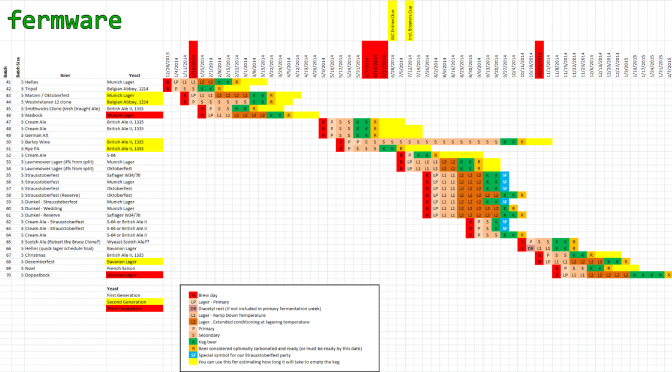
014-Schedule

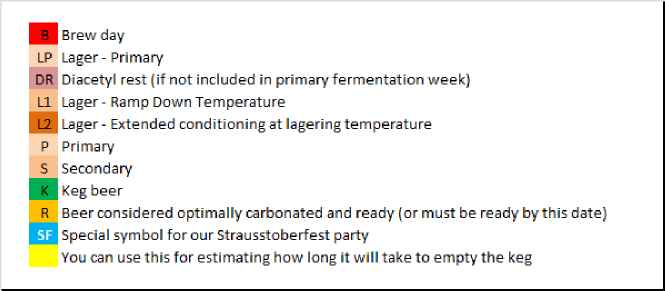
014-Schedule_Key

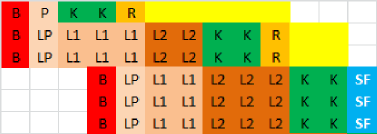
This is really the core of my schedule, since it helps manage the timing of your brews along with your equipment capacity. As you can see in my schedule, I typically brew two batches at a time (as mentioned in the ABOUT MY BREWING).  When pairs of three are shown, I’ve started messing with maxing out my kettles with 1.5x the grain bill and reducing the water a little during the mash and boil, so that I get 3 batches (~15 gallons for me) out of one brew session.
Since most of my fermentations just follow a similarly timed schedule, all I do is just cut & paste (CNTL-X & CNTL-V for those like-minded keyboard shortcut preferring keyboard jockeys).  You may notice that I plan to try out the condensed lagering schedule later this year that is getting some attention lately.  Here is a link to Brulosophy’s Lager Method.

Conclusions:

Like I said, I hope that this helps a fellow brewer out for mapping out their schedule or inspires another to build on this or create their own.  Happy Brewing!!


Mein Bierwagen

My wife and I throw our annual Strausstoberfest party every year on the last Saturday in September.  This occurs during the traditional Oktoberfest celebration.  Oktoberfest is synonymous with beer, awesome food and a certain amount of over the top pomp and circumstance.  For the last part, I decided that the beer I’ve spent the last 2+ months caring for MUST have a grand entrance.

Difficulty: level_3

This project just requires some basic building skills, but you might need some help getting the keezer onto the Bierwagen.

Time Required:

An afternoon for the build of the cart.  Longer if you want to paint or stain it.

Posts for this Project:

Part 1: Introduction (this post)
Part 2: Building of the frame
Part 3: Bicycle wheel attachment
Part 4: Getting the keezer onto the Bierwagen
Part 5: Keezer collar
Part 6: Storage of the Bierwagen

Affiliate Links

Overview:

Here I am rolling out the Bierwagen.  Notice the tap handles I made in the post Super Easy Tap Handles.

015-1 Roll out the Bierwagen

Here I am “tapping the keg” with my son looking on.  o’zapft is!

015-1 Tapping the Bier

Here is a 2015 update.  I’ve got my Hipster Cream Ale WBHY 3D printed tap handle as well as a 3D printed Darth Vader bust added to my Super Easy Tap Handles.

015-Strausstoberfest 2015 Bierwagen

The “rolling chassis”.  It uses the front wheels from my bike and my wife’s bike.  We don’t use them much in the fall, so why not be resourceful and use them?

015-1 Rolling chassis

The Bierwagen works in concert with my Keezer Dolly.

015-1 Keezer dolly onto Bierwagen

Nothing too novel here, just another keezer collar and my Ranco temperature controller mounted on back.

015-1 Ranco mounted on back

Stay tuned for my updates on the build for this project.

Up next…

Building of the frame