It is a hard truth that you will lose some temperature during your mash. In my desire to go electric, I recently purchased the BREWER’S EDGE® MASH & BOIL from William’s Brewing. Without actually even having brewed a batch of beer on it yet, I already got to work figuring out how to insulate it. I tested various insulation methods on the Mash & Boil, but the relative comparisons should be valid on any mash tun. A post with a better review of the Mash & Boil and my reasoning for wanting to go electric will come at a later date.
Nerd Alert!
Warning, the material in this post could get a bit nerdy.

Difficulty: 
Easy for you
Time Required:
Just a read for you fortunately. It took me about a week to perform the experiments.
Affiliate Links
Background:
One of the advantages of an electric brewing system should be accurate temperature control. With such a new system as the BREWER’S EDGE® MASH & BOIL, there is a lot of discussion about the 6 degree swing in temperature control. This is pretty well contrasted with much more expensive systems as the Grainfather or PicoBrew Zymatic that may hold temperature within a degree or two.
If you would like to read the comprehensive test of all insulation methods, check out this post: Mash Tun Insulation Comparisons – Complete
While I do agree this could and should be safely regulated to a tighter temperature band on the Mash & Boil, I would at least propose that the first line of defense is just to insulate your mash tun so that accurate temperature control is not as critical. In all reality, this is a turn-key electric brewing system for less than 1/3 the cost of the other systems on the market.
I initially started brewing with a 44 Qt kettle doing 5 gallon batches with a propane burner. I did notice a decent amount of temperature loss, so I created a thermal wrap to use during the mash. This was made using some cotton based insulation meant for water heaters. I did not want to mess with fiberglass based insulation. When I moved to a 62 Qt kettle and larger batches, I think the larger thermal mass helped maintain temperatures better, but I went ahead and used the same wrap anyway.
With the new system, it had such a different diameter to height ratio, I decided to start from new again. Since we homebrewers are a thrifty bunch, it usually comes down to whatever we had on hand at the time we needed to create it. This time for me, however, I had enough time to plan it out and (gasp) actually test it before using it. As stated before, these results should be applicable to any mash tun that adheres to the laws of thermodynamics.
Insulation methods to test:
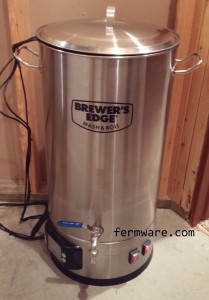
Baseline – Stock BREWER’S EDGE® MASH & BOIL kettle
- Described as double wall stainless construction
- Pros: you don’t have do do anything
- Cons: Hypothesis is that this will be the worst performer
Duck brand, cotton enhanced (Non-fiberglass)
- Was about $20 when I originally bought it and that is about the going rate at your local hardware store
- This was the insulation wrap from my 62Q Bayou Classic kettle
- Pros: Fairly inexpensive, relatively easy to find and no special handing required
- Cons: A bit dusty when cutting and not as tidy as the Reflectix
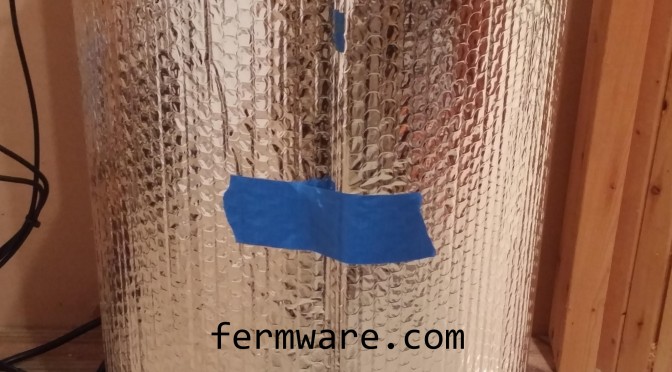
Reflectix
- It cost me $27 for a 25 foot roll at my local hardware store and is enough for 2 kettles worth
- 3 layers from the lip of the kettle to the top of the control box
- 3 layers loosely fit on the lid
- Pros: Easy to work with, clean look
- Cons: Really requires a semi-custom fit for it to perform well
- I’ll have a future post with cut dimensions so you can make your own
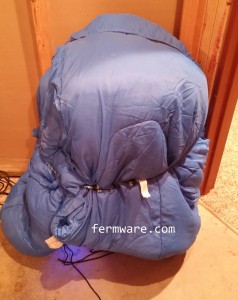
Cold weather sleeping bag
- No link, as these have been in my family for a LONG time
- Pros: super quick and most people have them on hand
- Cons: If you somehow damage it for brewing, you’ll probably get in trouble with your family
Baseline – Stock BREWER’S EDGE® MASH & BOIL kettle:
Nothing to see here… move along…
Duck brand, cotton enhanced:
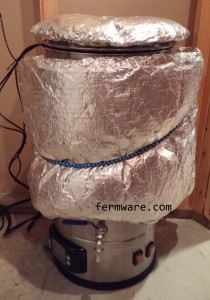
This was the setup from my 62 Qt. Kettle and wasn’t a custom fit for the Mash & Boil. I wrapped a bungee cord around it to keep it in place.
Reflectix:
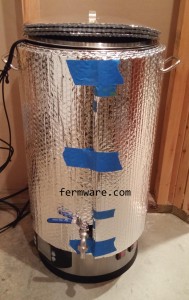
I custom tailored this wrap in 3 layers to fit this kettle. I wanted to be sure it did a sufficient job of insulating before I finished the edges off with Reflectix tape, hence the reason for the blue painters tape.
Sleeping Bag:
I wrapped the sleeping bag all the way around the kettle once and then had enough length left over to do a sort of “comb over” on the top of it. I finished it off by holding it on with the bungee cord.
Other methods considered (since I have seen them used), but not tested
- Fiberglass water heater insulation (I don’t want fiberglass anywhere near my beer)
- Single and double layers of Reflectix to understand the impact
- Custom molded expanding foam mold
- Red-Hooded sweatshirt
Setup and Test Methodology:
I have not modified the Mash & Boil in any way. I just used the unit in stock condition and let the temperature controller do it’s thing to get the water up to temperature. I used exactly 6 gallons of RO water for the experiment.
The kettle was placed in my basement storage room, which maintained a consistent 65 degF throughout the testing.
I had 3 temperature probes in the kettle. One at 1″ from the bottom, then another 6″ up and another 12″ up. This was a nice spread for 6 gallons of water. In reporting temperatures in this experiment I am only using the temperature sensor at the 6″ height. The other sensors were a proof of concept for some future testing I plan to carry out. I did see some stratification in the temperatures over time as the water cooled, but for consistency, I chose the 6″ probe.
To start the each test, I topped off to 6 gallons and set the Mash & Boil to 215 degF and let it ramp up. As soon as the system was boiling, I turned it off and unplugged it from the wall. Temperature measurements were taken approximately every minute. I allowed the temperatures to cool to somewhere around 100 degF or as long as I could stand it. Absolutely no stirring or opening of the lid occurred during the cool down.
The critical stage in the test was when the water cooled to 155 degF. At that point, marker would be taken and then compared to the temperature exactly 60 minutes later. This would be indicative of a typical mash temperature and the relative temperature loss during the mash. Yes there will be different thermal capacities of a water/grist mix, so to reduce the experiment to just the insulation, straight RO water was used.
Results:
I normalized the cool down datasets so that the start time (t=0) was the same for each configuration at 200 degF. As a visual reference aid, I placed a line at 155 degF to see what the curves look like near mash temperatures. One can clearly see here that the baseline configuration with no additional insulation decreases in temperature the most rapidly. The cotton based insulation is a bit better, then beat by the Reflectix and then the sleeping bag.
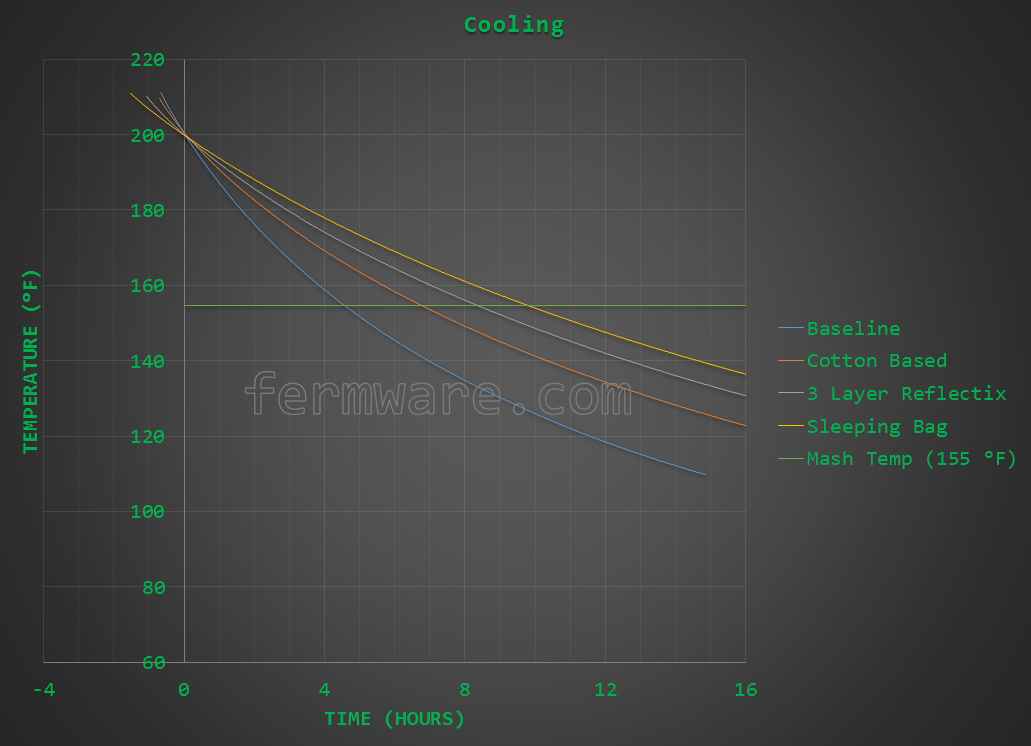
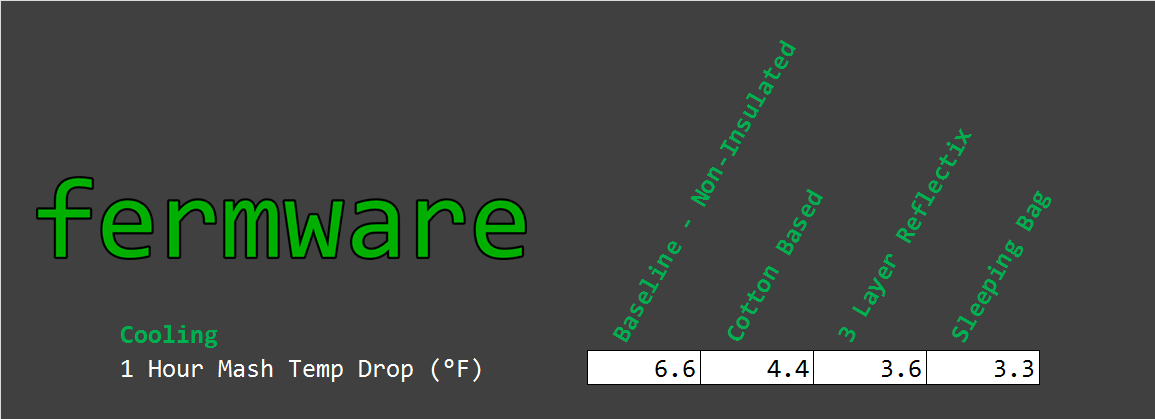
This small table places numerical values on the temperature drops through a simulated mash temperature window. I calculated these temperature drops by taking the very last data point that was greater than 155 degF. Then I grabbed the next data point that was +60 minutes from that initial point. The values shown are then the differences between those two temperatures.
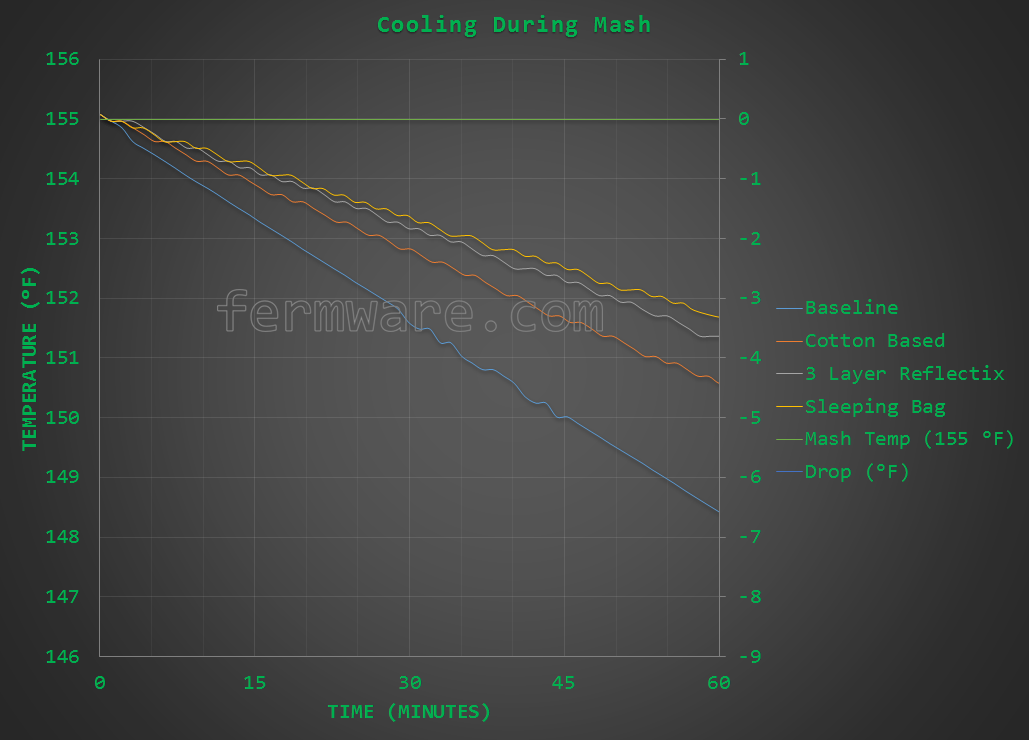
To glean even more from the data, I plotted the 4 different configurations only through the mash temperature window. I normalized these curves so that the start time (t=0) was the same for each configuration at 155 degF The left axis shows the actual temperature reading, while the right axis shows the temperature drop, relative to the 155 degF starting reference temperature. I also placed a helper line at 155 degF.
If you are to accept the belief that most of the conversion is done within the first 15 minutes of the mash, both the Reflectix and Sleeping Bag insulation methods show a drop of less than 1 degF within the first 15 minutes.
Discussion:
My worst fear when starting this experiment would be that there would be little to no measurable difference in the insulation methods. I was pleasantly surprised when processing the results, there were clear and measurable trends in the data.
None of the installations were optimized, but I think that unless you are really a stickler, the level of care i took on each installation is all the typical brewer would want to mess with on brew day.
Even though the clear winner in this showdown was the sleeping bag, as with almost all of my brewing equipment, I prefer to have it all dedicated to just brewing. As such, I will go with the Reflectix jacket. I am not going to pull the sleeping bags out of our closet on brew day. Not to mention the eventual spillage of wet sticky grain outside of the kettle and the associated clean up of the sleeping bag. I do plan to finish off the edges of my Reflectix setup so that when it does get messy, I can just spray it off with water.
I could possibly run another test with more layers of Reflectix, and I would suspect you would get closer to the performance of the sleeping bag. However, in my case, I purchased a 25 foot roll and intend to make 2 sets worth out of the one roll, which gave me 3 layers worth for each.
Conclusion:
Everyone has their own selection criteria when choosing the best equipment for their needs, so I hope you’ll find the information reported in this post useful.
Disclaimer:
William’s Brewing has been set up as an affiliate site, so clicking on links to the Mash and Boil system on this site and in this post will give credit to fermware.com for the referral. This post and any others, should not be taken as an endorsement of the BREWER’S EDGE® MASH & BOIL, it was simply the test bed for my experiments. If you found this post helpful and do wish to purchase the BREWER’S EDGE® MASH & BOIL, please click on the links listed on this site and in this post.